AWS News Blog
AWS Lambda – A Look Back at 2016
2016 was an exciting year for AWS Lambda, Amazon API Gateway and serverless compute technology, to say the least. But just in case you have been hiding away and haven’t heard of serverless computing with AWS Lambda and Amazon API Gateway, let me introduce these great services to you. AWS Lambda lets you run code without provisioning or managing servers, making it a serverless compute service that is event-driven and allows developers to bring their functions to the cloud easily for virtually any type of application or backend. Amazon API Gateway helps you quickly build highly scalable, secure, and robust APIs at scale and provides the ability to maintain and monitor created APIs.
With the momentum of serverless in 2016, of course, the year had to end with a bang as the AWS team launched some powerful service features at re:Invent to make it even easier to build serverless solutions. These features include:
- AWS Greengrass: Run local compute, messaging & data caching for connected IoT devices using Lambda and AWS IoT; https://aws.amazon.com/blogs/aws/aws-greengrass-ubiquitous-real-world-computing/
- Lambda@Edge Preview: New Lambda feature that allows code to be run at global AWS edge locations and triggered in response to Amazon CloudFront requests to reduce network latency to end users; https://aws.amazon.com/blogs/aws/coming-soon-lambda-at-the-edge/
- AWS Batch Preview: Batch computing workload planning, scheduling, and execution across AWS compute services including upcoming Lambda integration as a batch Job; https://aws.amazon.com/blogs/aws/aws-batch-run-batch-computing-jobs-on-aws/
- AWS X-Ray: Analyze and debug distributed applications, such as those built using a microservices architecture, written in Java, Node.js, and .NET deployed on EC2, ECS, AWS Elastic Beanstalk, and upcoming AWS Lambda support; https://aws.amazon.com/blogs/aws/aws-x-ray-see-inside-of-your-distributed-application/
- Continuous Deployment for Serverless: AWS services to create a continuous deployment pipeline for your serverless applications; https://aws.amazon.com/blogs/compute/continuous-deployment-for-serverless-applications/
- Step Functions: Using visual workflows as a reliable way to organize the components of microservices and distributed applications; https://aws.amazon.com/blogs/aws/new-aws-step-functions-build-distributed-applications-using-visual-workflows/
- Snowball Edge: Petabyte-scale data transport appliance with on-board storage and Lambda-powered local processing: https://aws.amazon.com/blogs/aws/aws-snowball-edge-more-storage-local-endpoints-lambda-functions/
- Dead Letter Queues: Support for Lambda function failure notifications to queue or another notification system
- C# Support: C# code as a supported language for AWS Lambda
- API Gateway Monetization: Integration of API Gateway with AWS Marketplace
- API Gateway Developer Portal: Open source serverless web application to get started building your own developer portal
Since Jeff has already introduced most of the aforementioned new service features for building distributed applications and microservices like Step Functions, let’s walk-through the last four new features not yet discussed using a common serverless use case example: Real-time Stream Processing. In our walk-through of the stream processing use case, we will implement a Dead Letter Queue for notifications of errors that may come from the Lambda function processing a stream of data, we will take an existing Lambda function written in Node.js to process the stream and rewrite it using the C# language. We then will build an example of the monetization of a Lambda backed API using API Gateway’s integration with AWS Marketplace. This will be exciting, so let’s get started.
During the AWS Developer Days in San Francisco and Austin, I presented an example of leveraging AWS Lambda for real-time stream processing by building a demo showcasing a streaming solution with Twitter Streaming APIs. I will build upon this example to demonstrate the power of Dead Letter Queues (DLQ), C# Support, API Gateway Monetization features, and the open source template for API Gateway Developer Portal. In the demo, a console or web application streams tweets gathered from the Twitter Streaming API that has the keywords ‘awscloud’ and/or ‘serverless’. Those tweets are sent real-time to Amazon Kinesis Streams where Lambda detects the new records and processes the stream batch by writing the tweets to the NoSQL database, Amazon DynamoDB.
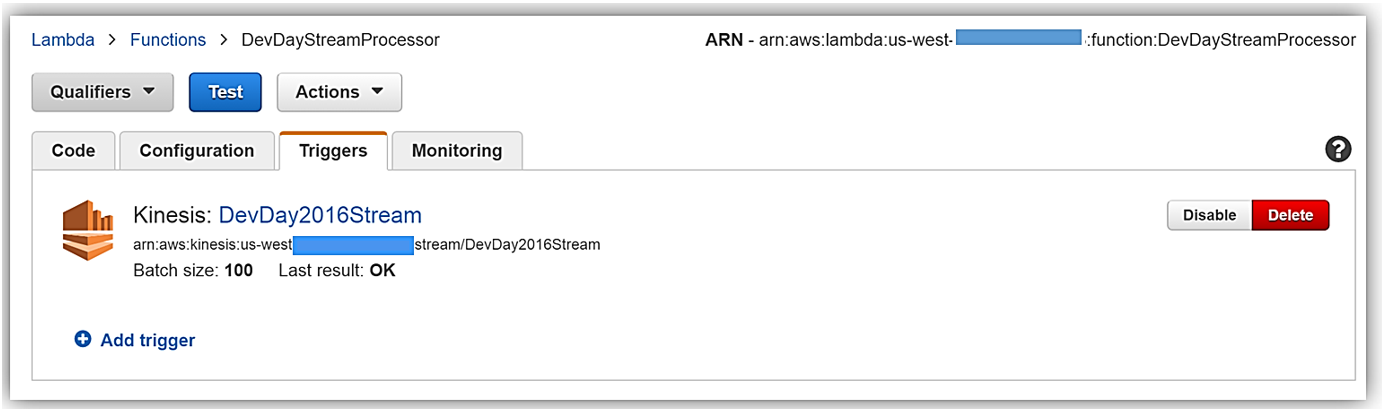
Now that we understand the real-time streaming process demo’s workflow, let’s take a deeper look at the Lambda function that processes the batch records from Kinesis. First, you will notice below that the Lambda function, DevDayStreamProcessor, has an event source or trigger that is a Kinesis stream named DevDay2016Stream with a Batch size of 100. Our Lambda function will poll the stream periodically for new records and automatically read and process batches of records, in this case, the tweets detected on the stream.
Now we will examine our Lambda function code which is written in Node.js 4.3. The section of the Lambda function shown below loops through the batch of tweet records from our Kinesis stream, parses each record, and writes desired tweet information into an array of JSON data. The array of the JSON tweet items is passed to the function, ddbItemsWrite which is outside of our Lambda handler.
'use strict';
console.log('Loading function');

var timestamp;
var twitterID;
var tweetData;
var ddbParams;
var itemNum = 0;
var dataItemsBatch = [];
var dbBatch = [];
var AWS = require('aws-sdk');
var ddbTable = 'TwitterStream';
var dynamoDBClient = new AWS.DynamoDB.DocumentClient();

exports.handler = (event, context, callback) => {
    var counter = 0;

    event.Records.forEach((record) => {
        // Kinesis data is base64 encoded so decode here
        console.log("Base 64 record: " + JSON.stringify(record, null, 2));
        const payload = new Buffer(record.kinesis.data, 'base64').toString('ascii');
        console.log('Decoded payload:', payload);

        var data = payload.replace(/[\u0000-\u0019]+/g," ");
        try
        {  tweetData = JSON.parse(data);   }
        catch(err)
        {  callback(err, err.stack);   }

        timestamp = "" + new Date().getTime();
        twitterID = tweetData.id.toString();
        itemNum = itemNum+1;

         var ddbItem = {
                PutRequest: {
                    Item: {
                        TwitterID: twitterID,
                        TwitterUser: tweetData.username.toString(),
                        TwitterUserPic: tweetData.pic,
                        TwitterTime: new Date(tweetData.time.replace(/( \+)/, ' UTC$1')).toLocaleString(),
                        Tweet: tweetData.text,
                        TweetTopic: tweetData.topic,
                        Tags: (tweetData.hashtags) ? tweetData.hashtags : " ",
                        Location: (tweetData.loc) ? tweetData.loc : " ",
                        Country: (tweetData.country) ? tweetData.country : " ",
                        TimeStamp: timestamp,
                        RecordNum: itemNum
                    }
                }
            };

            dataItemsBatch.push(ddbItem);
            counter++;
});

    var twitterItems = {};
    twitterItems[ddbTable] = dataItemsBatch;
    ddbItemsWrite(twitterItems, 0, context, callback);

};
The ddbItemsWrite function shown below will take the array of JSON tweet records processed from the Kinesis stream, and write the records multiple items at a time to our DynamoDB table using batch operations. This function leverages the DynamoDB best practice of retrying unprocessed items by implementing an exponential backoff algorithm to prevent write request failures due to throttling on the individual tables.
 function ddbItemsWrite(items, retries, ddbContext, ddbCallback)
    {
        dynamoDBClient.batchWrite({ RequestItems: items }, function(err, data)
            {
                if (err)
                {
                    console.log('DDB call failed: ' + err, err.stack);
                    ddbCallback(err, err.stack);
                }
                else
                {
                    if(Object.keys(data.UnprocessedItems).length)
                    {
                        console.log('Unprocessed items remain, retrying.');
                        var delay = Math.min(Math.pow(2, retries) * 100, ddbContext.getRemainingTimeInMillis() - 200);
                        setTimeout(function() {ddbItemsWrite(data.UnprocessedItems, retries + 1, ddbContext, ddbCallback)}, delay);
                    }
                    else
                    {
                         ddbCallback(null, "Success");
                         console.log("Completed Successfully");
                    }
                }
            }
        );
    }
Currently, this Lambda function works as expected and will successfully process tweets captured in Kinesis from the Twitter Streaming API, however, this function has a flaw that will cause an error to occur when processing batch write requests to our DynamoDB table. In the Lambda function, the current code does not take into account that the DynamoDB batchWrite function should be comprised of no more than 25 write (put) requests per single call to this function up to 16 MB of data. Therefore, without changing the code appropriately to have the ddbItemsWrite function to handle batches of 25 or have the handler function put items in the array in groups of 25 requests before sending to the ddbItemsWrite function; there will be a validation exception thrown when the batch of tweets items sent is greater than 25. This is a great example of a bug that is not easily detected in small-scale testing scenarios yet will cause failures under production load.
Dead Letter Queues
Now that we are aware of an event that will cause the ddbItemsWrite Lambda function to throw an exception and/or an event that will fail while processing records, we have a first-rate scenario for leveraging Dead Letter Queues (DLQ).
Since AWS Lambda DLQ functionality is only available for asynchronous event sources like Amazon S3, Amazon SNS, AWS IoT or direct asynchronous invocations, and not for streaming event sources such as Amazon Kinesis or Amazon DynamoDB streams; our first step is to break this Lambda function into two functions. The first Lambda function will handle the processing of the Kinesis stream, and the second Lambda function will take the data processed by the first function and write the tweet information to DynamoDB. We will then setup our DLQ on the second Lambda function for the error that will occur on writing the batch of tweets to DynamoDB as noted above.
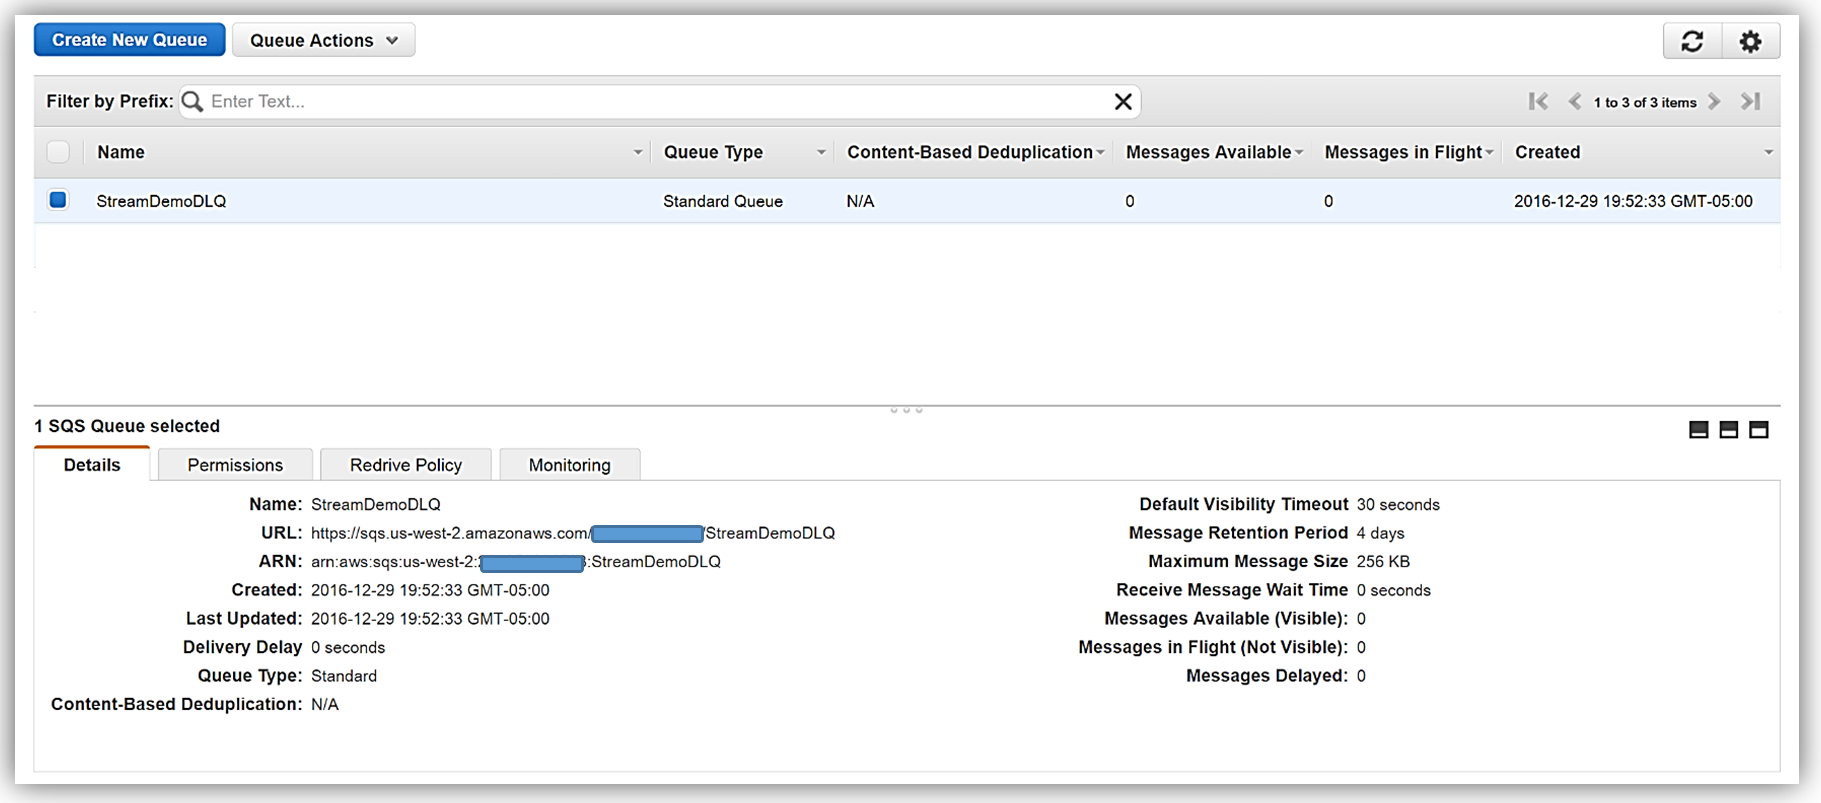
We have two options when setting up a target for our DLQ; Amazon SNS topic or an Amazon SQS queue. In this walk-through, we will opt for using an Amazon SQS queue. Therefore, my first step in using DLQ is to create a SQS Standard queue. A Standard queue type is a queue which has high transactions throughput, a message will be delivered at least once, but another copy of the message may also be delivered, and it is possible that messages might be delivered in an order different from which they were sent. You can learn more about creating SQS queues and queue type in the Amazon SQS documentation.
Once my queue, StreamDemoDLQ, is created, I will grab the ARN from the Details tab of this selected queue. If I am not using the console to designate the DLQ resource for this function, I will need the ARN for the queue for my Lambda function to identify this SQS queue as the DLQ target for error and event failure notifications. Additionally, I will use the ARN to add permissions to my Lambda execution role policy in order to access this SQS queue.
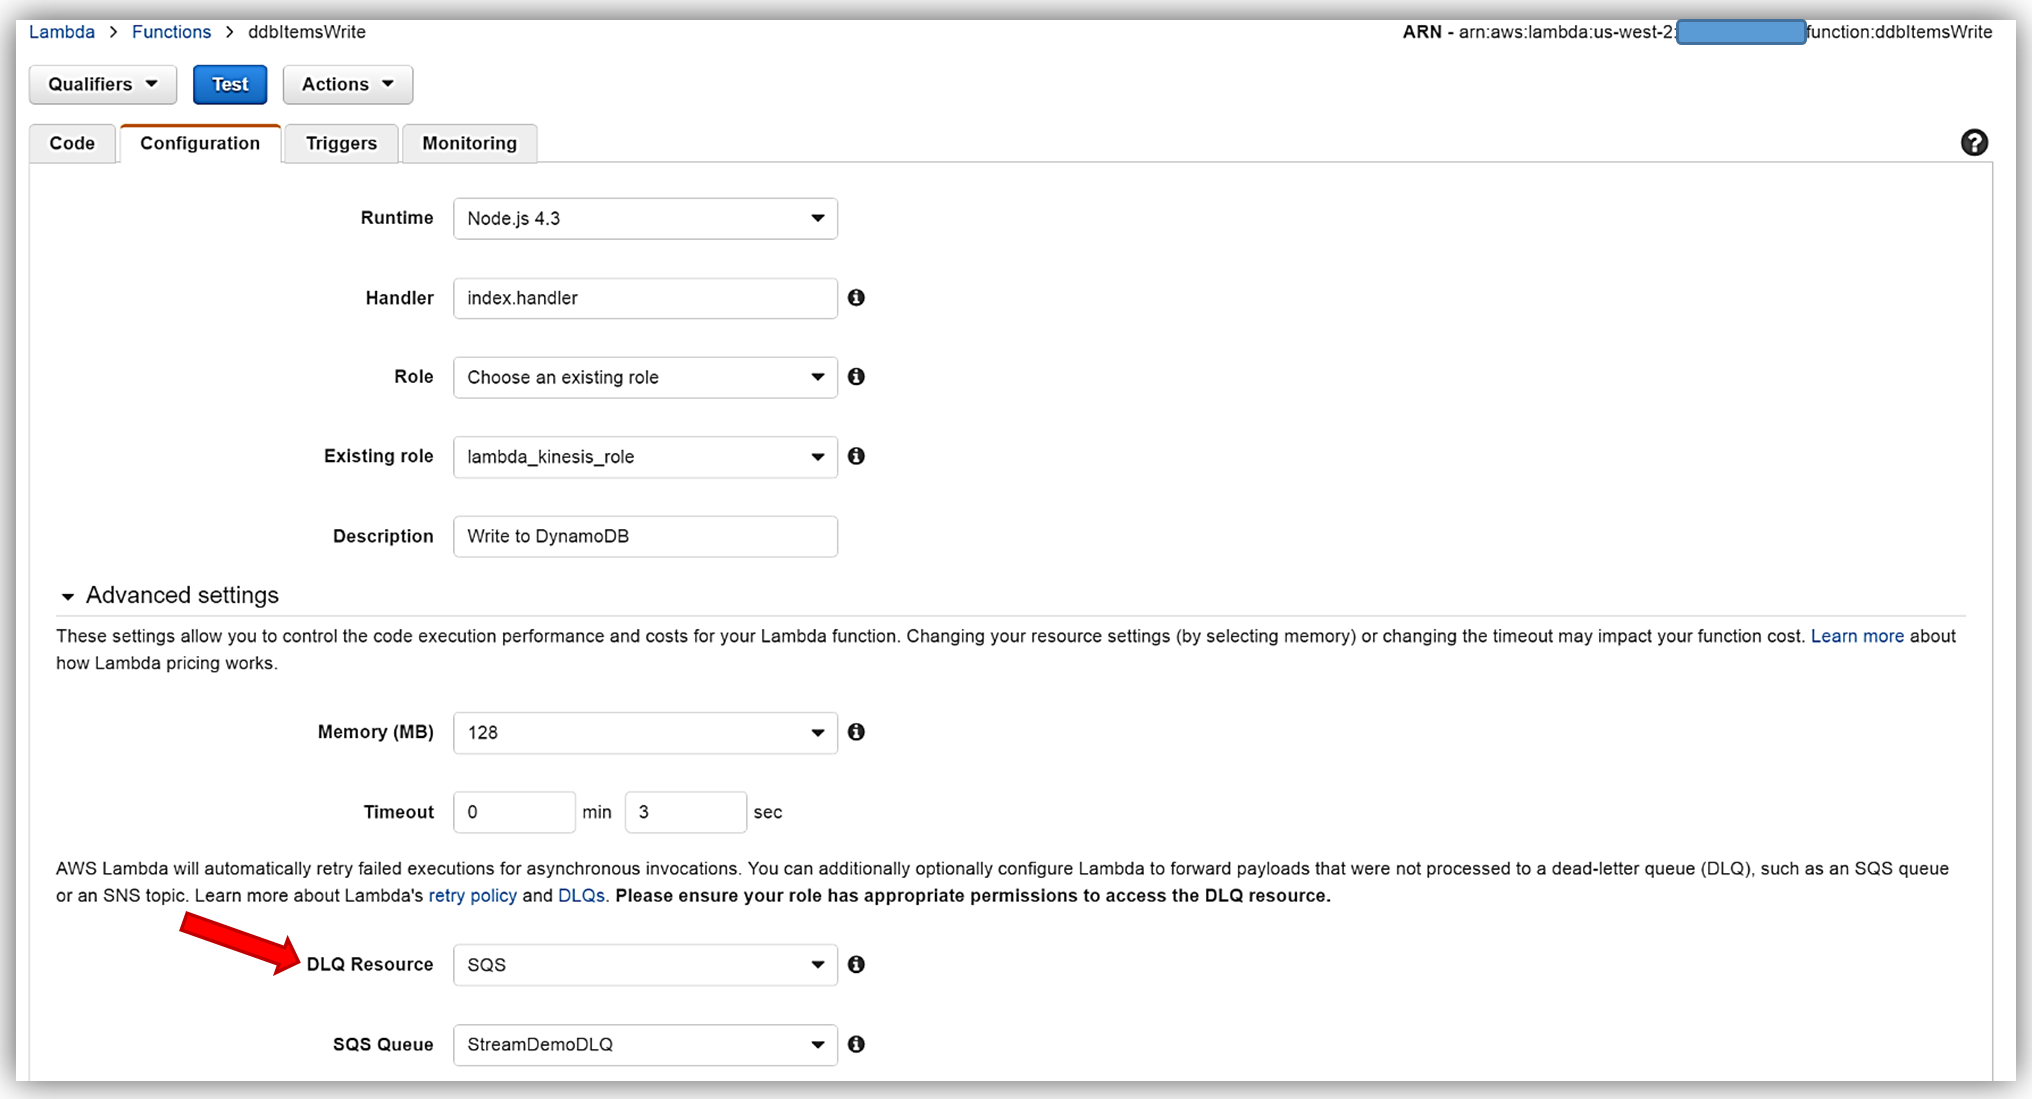
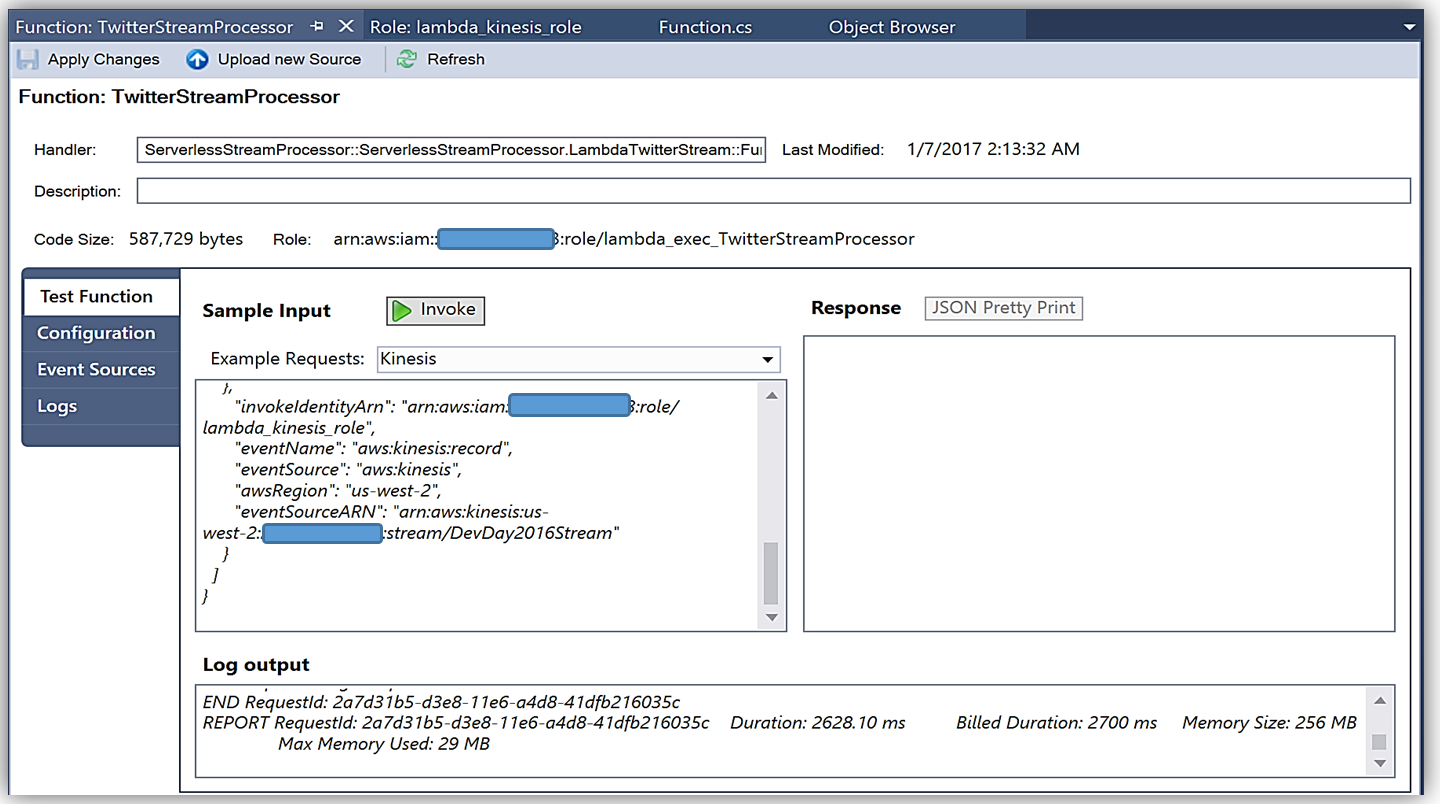
I will now return to my Lambda function and select the Configuration tab and expand the Advanced settings section. I will select SQS in the DLQ Resource field and select my StreamDemoDLQ queue in the SQS Queue field dropdown.
Remember, the execution role for the Lambda function must explicitly provide sqs:SendMessage access permissions to in order to successfully send messages to your SQS DLQ. Therefore, I ensured that my Lambda role, lambda_kinesis_role, has the following IAM policy for SQS permissions.

We have now successfully configured a Dead Letter Queue for our Lambda function using Amazon SQS. To learn more about Dead Letter Queues in Lambda, read the Troubleshooting and Monitoring section of the AWS Lambda Developer Guide and check out the AWS Compute Blog post on Dead Letter Queues.
C# Support
As I mentioned earlier, another very exciting feature added to Lambda during AWS re:Invent was the support for the C# language via the open source .NET Core 1.0 platform. Since the Lambda console does not offer editing for compiled languages yet, in order to author a C# Lambda function you can use tooling in Visual Studio with the AWS Toolkit, Yeoman, and/or the .NET CLI. To deploy Lambda functions written in C#, you can use the Lambda plugin in the AWS ToolKit for Visual Studio or create a deployment package with the .NET Core command line.
A C# Lambda function handler should be defined as an instance or static method in a class. There are two handler function parameters; the first is the input type which is the event data and second is the Lambda context object of type ILambdaContext. The event data input object types for AWS Services include the following:
- Amazon.Lambda.APIGatewayEvents
- Amazon.Lambda.CognitoEvents
- Amazon.Lambda.ConfigEvents
- Amazon.Lambda.DynamoDBEvents
- Amazon.Lambda.KinesisEvents
- Amazon.Lambda.S3Events
- Amazon.Lambda.SNSEvents
Now that we have discussed more detail around C# Support in Lambda, let’s rewrite our DevDayStreamProcessor lambda function with the C# language. For this example, I will use Visual Studio IDE to write the Lambda function, and additionally take advantage of the AWS Lambda Visual Studio plugin to deploy the function. Remember in order to use the AWS Toolkit for Visual Studio with Lambda, you will need to have Visual Studio 2015 Update 3 version and NET Core tools. You can read more about installing Visual Studio 2015 Update 3 and .NET Core here.
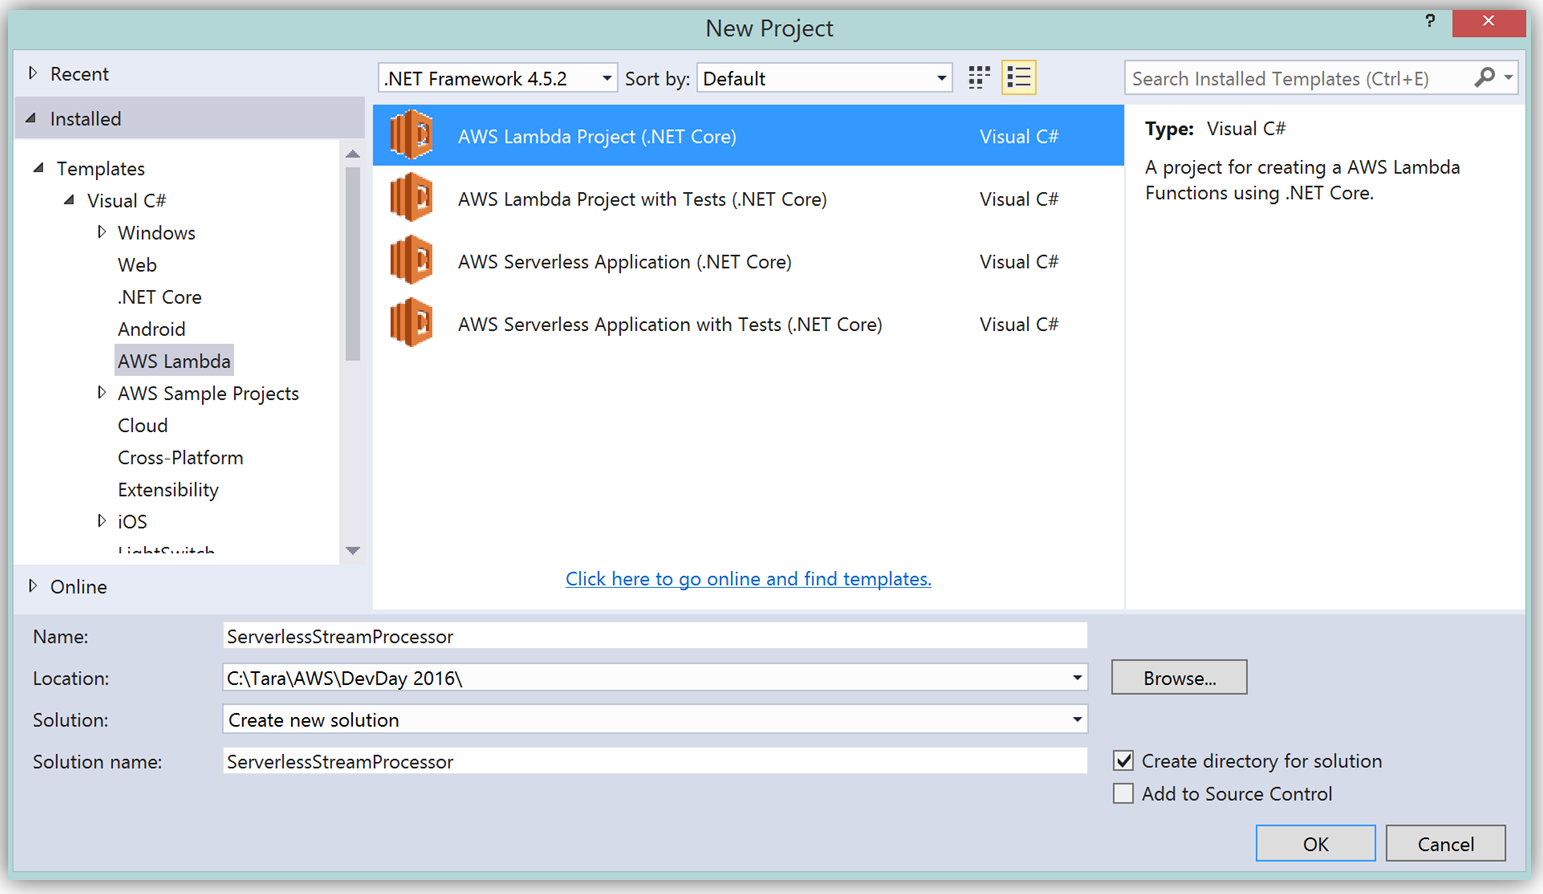
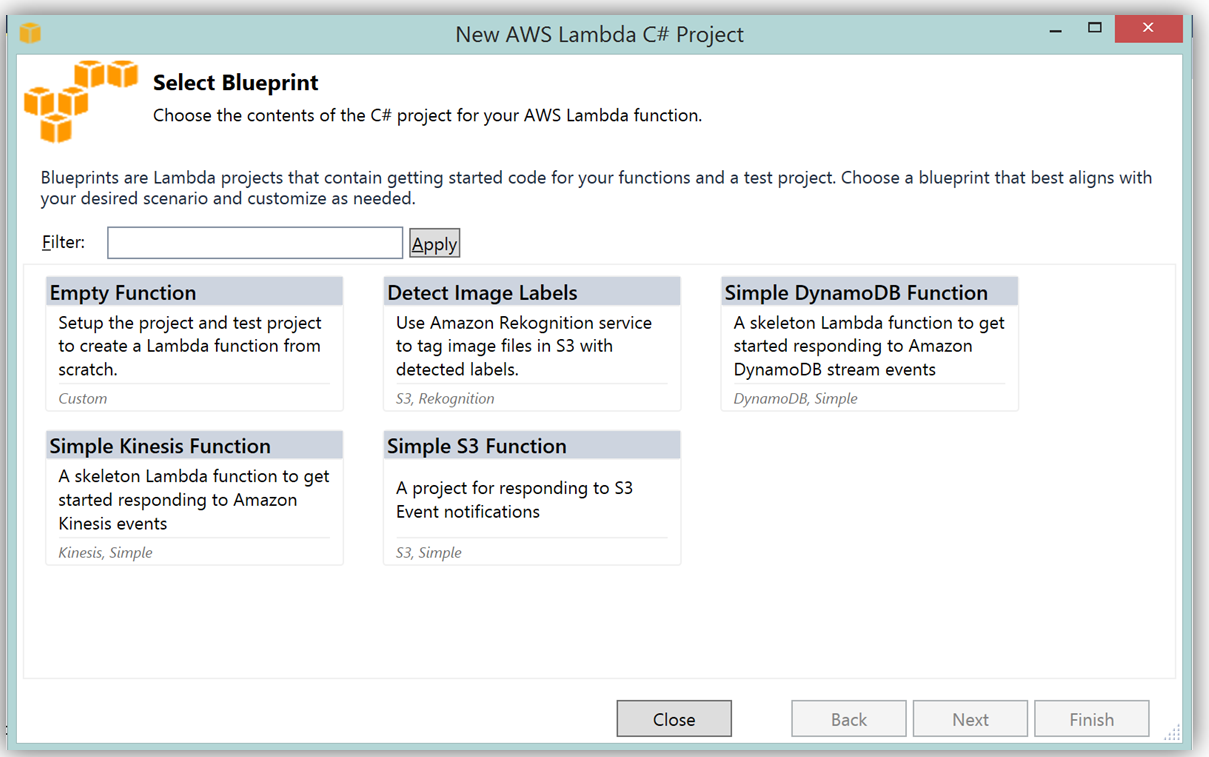
To create the C# function using Visual Studio, I start a New Project, select AWS Lambda Project (.NET Core) and name it ServerlessStreamProcessor.
What’s really cool about taking advantage of the AWS Toolkit for Visual Studio to author this function, is that inside of Visual Studio I can use Lambda blueprints to get started in a similar way that I would in using the Lambda console. Therefore in order to replicate the DevDayStreamProcessor in C#, I will select the Simple Kinesis Function blueprint.
It should be noted that when writing Lambda functions in C#, there is no need to mark the class declaration nor the target handler function as a Lambda function. Additionally, when writing CloudWatch logs you can use the standard C# Console class WriteLine function or use the ILambdaContext LogLine function found as a part of the ILambdaContext interface. With the template for accessing the Kinesis stream in place, I finish writing the C# Lambda function, ServerlessStreamProcessor, utilizing the same variable names as in the Node.js code in DevDayStreamProcessor. Please note the C# Lambda handler function below.
using System.Collections.Generic;
using Amazon.Lambda.Core;
using Amazon.Lambda.KinesisEvents;
using Amazon.DynamoDBv2;
using Amazon.DynamoDBv2.DataModel;
using Newtonsoft.Json.Linq;

// Assembly attribute to enable the Lambda function's JSON input to be converted into a .NET class.
[assembly: LambdaSerializerAttribute(typeof(Amazon.Lambda.Serialization.Json.JsonSerializer))]

namespace ServerlessStreamProcessor
{
    public class LambdaTwitterStream
    {
        string twitterID, timeStamp;
        int itemNum = 0;

        private static AmazonDynamoDBClient dynamoDBClient = new AmazonDynamoDBClient();
        List<TwitterItem> dataItemsBatch = new List<TwitterItem>();

        public void FunctionHandler(KinesisEvent kinesisEvent, ILambdaContext context)
        {
            DynamoDBContext dbContext = new DynamoDBContext(dynamoDBClient);
            context.Logger.LogLine($"Beginning to process {kinesisEvent.Records.Count} records...");

            foreach (var record in kinesisEvent.Records)
            {
                context.Logger.LogLine($"Event ID: {record.EventId}");
                context.Logger.LogLine($"Event Name: {record.EventName}");

                // Kinesis data is base64 encoded so decode here
                string tweetData = GetRecordContents(record.Kinesis);
                context.Logger.LogLine($"Decoded Payload: {tweetData}");
                tweetData = @"" + tweetData;
                JObject twitterObj = JObject.Parse(tweetData);

                twitterID = twitterObj["id"].ToString();
                timeStamp = DateTime.Now.Millisecond.ToString();
                itemNum++;
                context.Logger.LogLine(timeStamp);
                context.Logger.LogLine($"Twitter ID is: {twitterID}");
                context.Logger.LogLine(itemNum.ToString());

                TwitterItem ddbItem = new TwitterItem()
                {
                    TwitterID = twitterID,
                    TwitterUser = twitterObj["username"].ToString(),
                    TwitterUserPic = twitterObj["pic"].ToString(),
                    TwitterTime = DateTime.Parse(twitterObj["time"].ToString()).ToUniversalTime().ToString(),
                    Tweet = twitterObj["text"].ToString(),
                    TweetTopic = twitterObj["topic"].ToString(),
                    Tags = twitterObj["hashtags"] != null ? twitterObj["hashtags"].ToString() : String.Empty,
                    Location = twitterObj["loc"] != null ? twitterObj["loc"].ToString() : String.Empty,
                    Country = twitterObj["country"] != null ? twitterObj["country"].ToString() : String.Empty,
                    TimeStamp =  timeStamp,
                    RecordNum = itemNum
                };

                dataItemsBatch.Add(ddbItem);
            }

            context.Logger.LogLine(JObject.FromObject(dataItemsBatch).ToString());
            ddbItemsWrite(dataItemsBatch, 0, dbContext, context);
            context.Logger.LogLine("Success - Completed Successfully");
            context.Logger.LogLine("Stream processing complete.");
        }
There are only a few differences that should be noted between our Kinesis stream processor written in C# and our original Node.js code. Since the input parameter type supported by default in C# Lambda functions is the System.IO.Stream type, the Kinesis base64 string is decoded by using a StreamReader with ASCII encoding in a blueprint provided function, GetRecordContents.
private string GetRecordContents(KinesisEvent.Record streamRecord)
{
    using (var reader = new StreamReader(streamRecord.Data, Encoding.ASCII))
    {
        return reader.ReadToEnd();
    }
}
The other thing to note is that in order to write the tweet data to the DynamoDB Table, I added the AWS .NET SDK NuGet package for DynamoDB; AWSSDK.DynamoDBv2 to the Lambda function project via the NuGet package manager within Visual Studio. I also created a .NET data object, TwitterItem, to map to the data being stored in the DynamoDB table. Using the AWS .NET SDK higher level programming interface, object persistence model for DynamoDB, I created a collection of TwitterItem objects to be written via the BatchWrite object class in our ddbItemsWrite C# function.
private async void ddbItemsWrite(List<TwitterItem> items, int retries, DynamoDBContext ddbContext, ILambdaContext context)
{
BatchWrite<TwitterItem> twitterStreamBatchWrite = ddbContext.CreateBatchWrite<TwitterItem>();

        try
        {
            twitterStreamBatchWrite.AddPutItems(items);
            await twitterStreamBatchWrite.ExecuteAsync();
        }
        catch (Exception ex)
        {
            context.Logger.LogLine($"DDB call failed: {ex.Source} ");
            context.Logger.LogLine($"Exception: {ex.Message}");
            context.Logger.LogLine($"Exception Stacktrace: {ex.StackTrace}");
        }
}
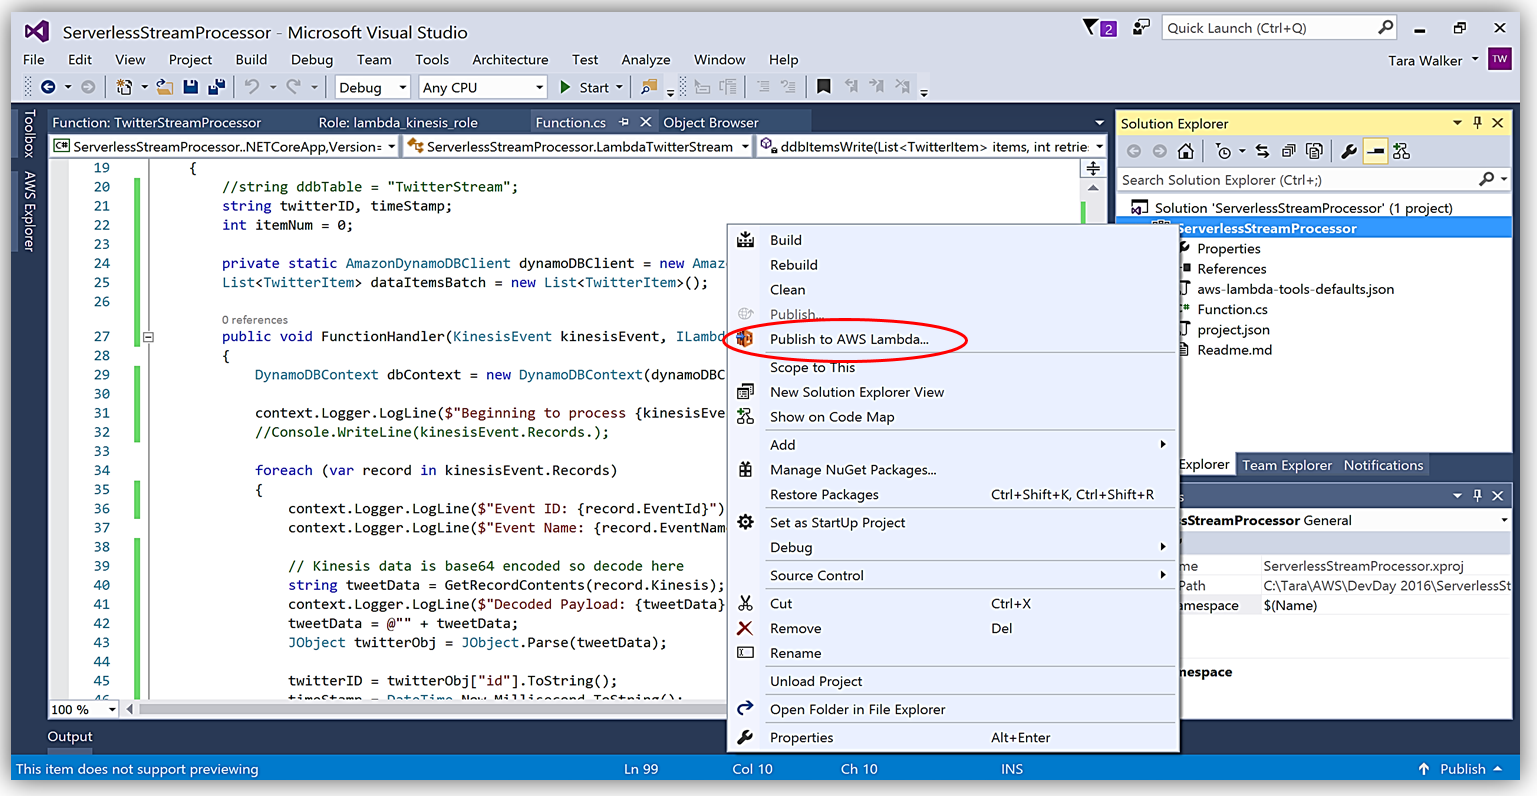
Another benefit of using AWS Toolkit for Visual Studio to author my C# Lambda function is that I can deploy my Lambda function directly to AWS with a single click. Selecting my project name in the Solution Explorer and performing a right-click, I get a menu option, Publish to AWS Lambda, which brings up a menu for information to include about my Lambda function for deployment to AWS.
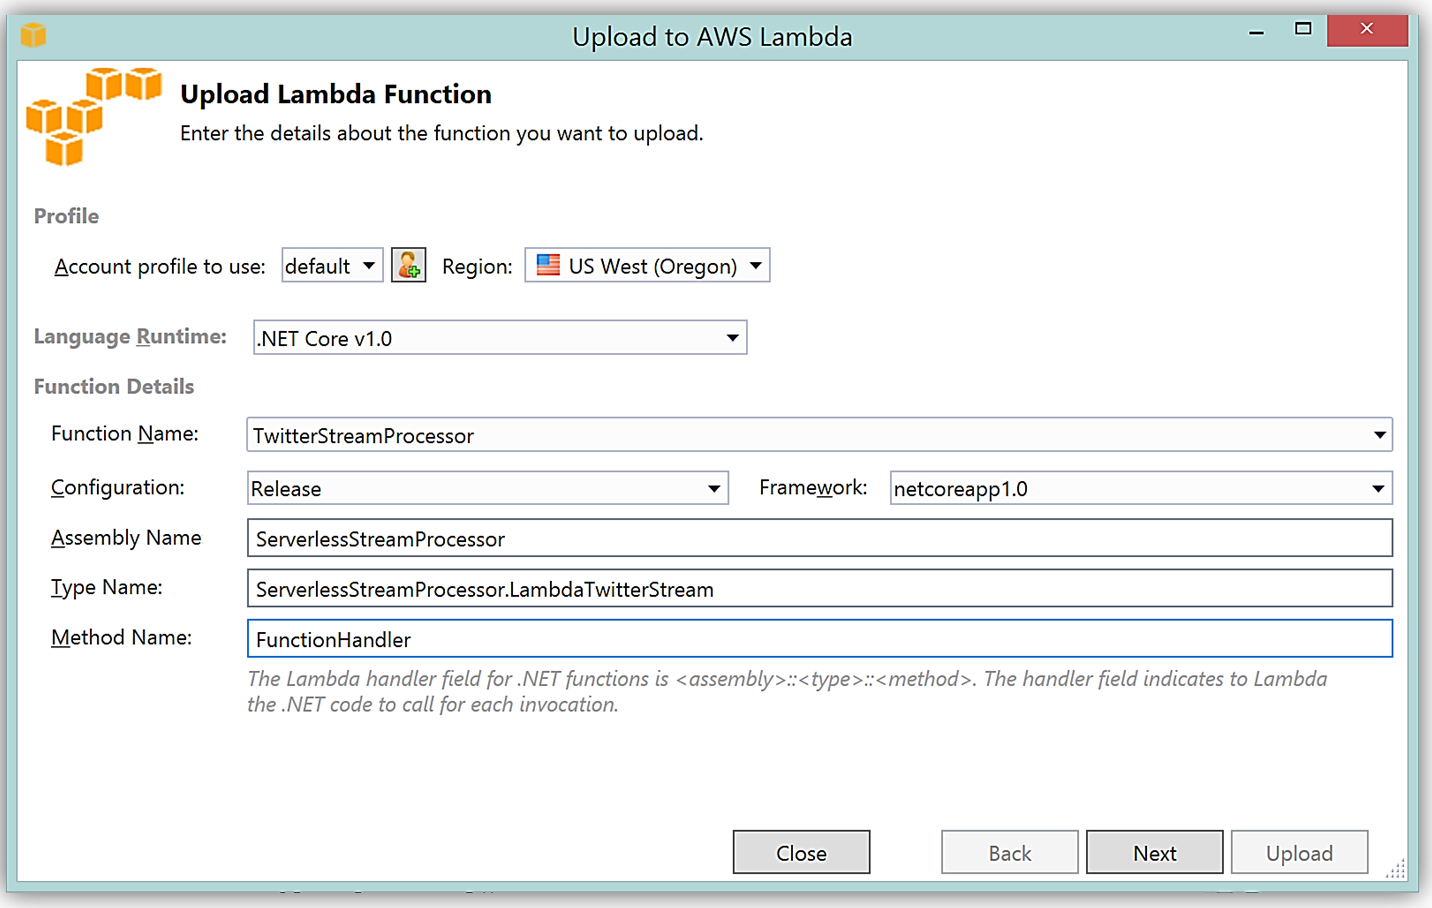
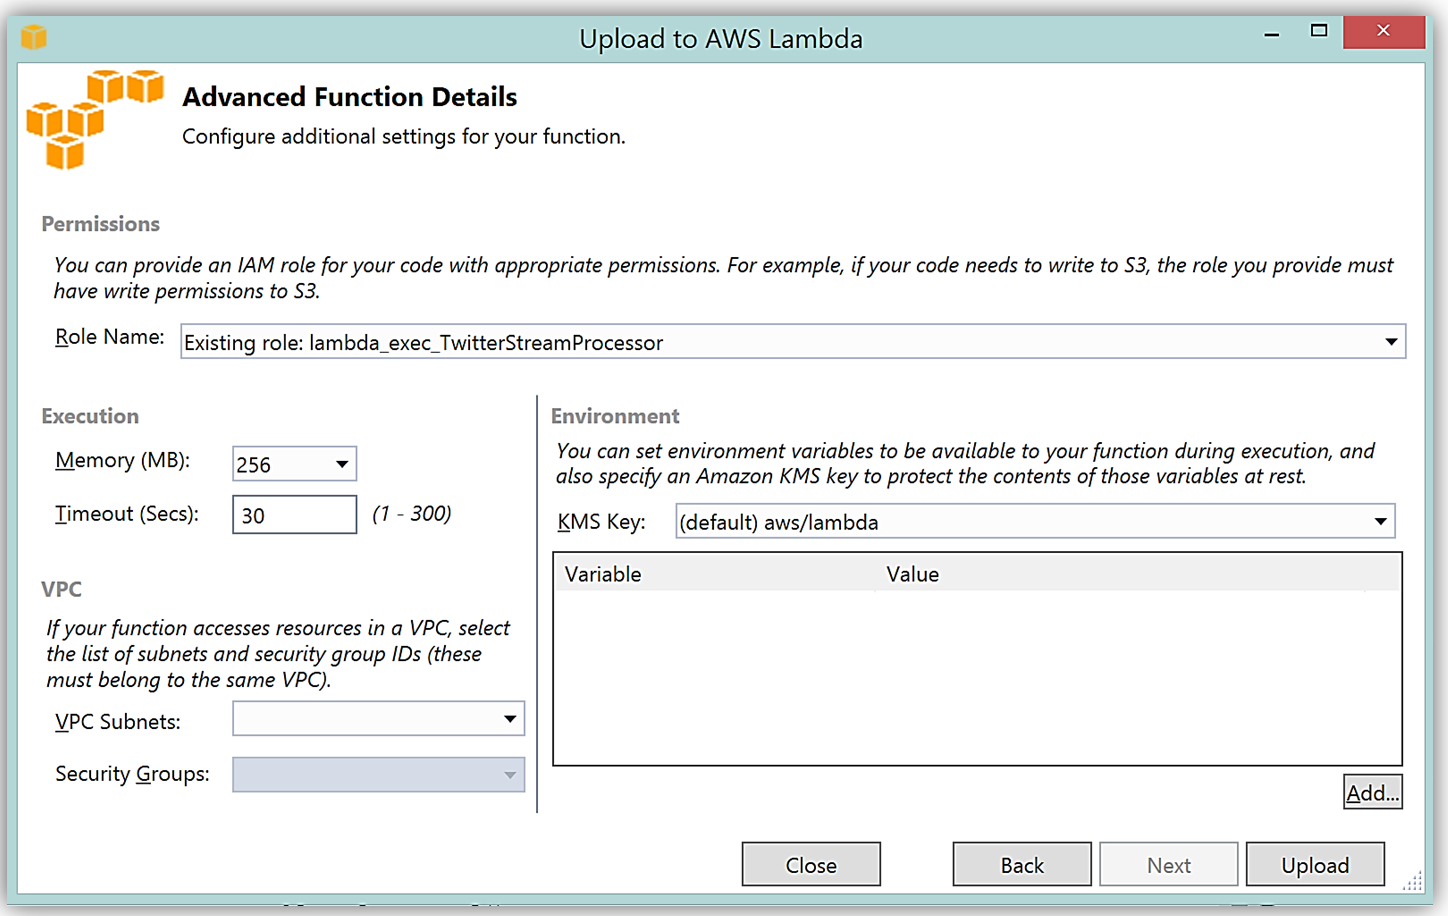
It is important to note that the handler function signature follows the nomenclature of Assembly :: Namespace :: ClassName :: Method, therefore, the signature of our C# Lambda function shown here is: ServerlessStreamProcessor :: ServerlessStreamProcessor.LambdaTwitterStream :: FunctionHandler. We provide this information to the Upload to AWS Lambda dialog box and select Next to assign a role for the function.
Upon completion, you can test in the Lambda console or in Visual Studio with AWS toolkit provided plugin (shown below) using the sample data of the triggering event source for an iterative approach to developing the Lambda function.
You can learn more about authoring AWS Lambda functions using the C# Language in the AWS Lambda developer guide or by reading the post announcing C# Support on the Compute Blog.
API Gateway Monetization and Developer Portal
If you have been following the microservices momentum, you may be aware of an architectural pattern that calls for using smart endpoints and/or using an API gateway via REST APIs to manage access and exposure of individual services that make up a microservices solution. Amazon API Gateway enables creation and management of RESTful APIs to expose AWS Lambda functions, external HTTP endpoints, as well as, other AWS services. In addition, Amazon API Gateway allows clients and external developers to have access to a deployed APIs by via HTTP protocol or a platform/language targeted SDK.
With the introduction of SaaS Subscriptions on AWS Marketplace and the API Gateway integration with the AWS Marketplace, you can now monetize your APIs by allowing customers to directly consume the APIs you create with API Gateway in the AWS Marketplace. AWS customers can subscribe and be billed for the APIs published on the marketplace with their existing AWS account. With the integration of API Gateway with the AWS Marketplace, the process to get started is easy on the AWS Marketplace.
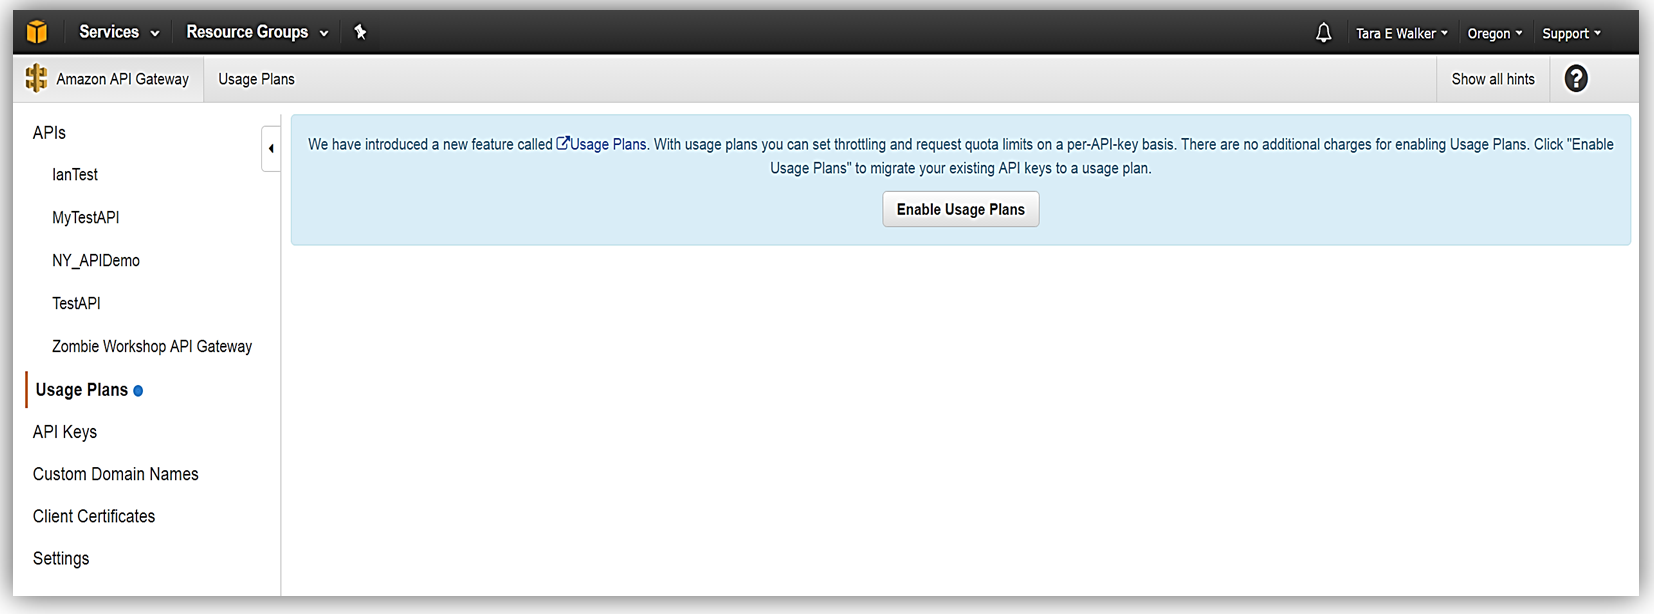
To get started, you must ensure that you have enabled the Usage Plan feature in Amazon API Gateway.
Once enabled the next step is to create a Usage Plan, enable throttling (if desired) with targeted rate and burst request thresholds, and finally enable quotas (if you choose) by providing targeted request quota per a set timeframe.

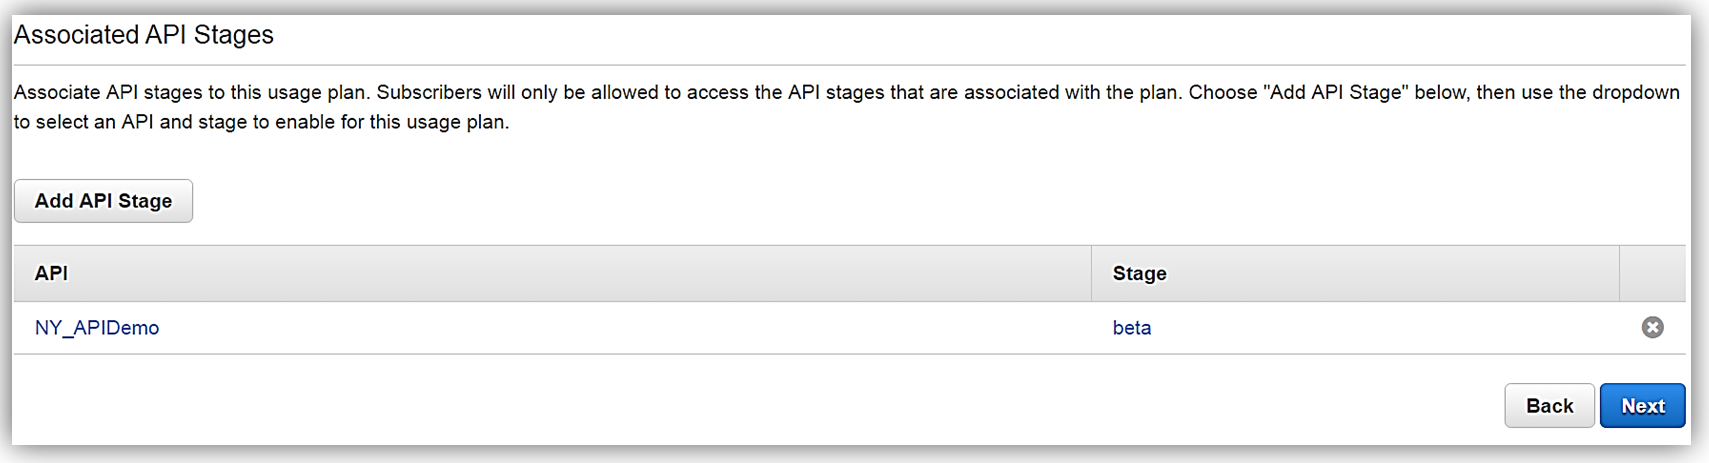
Next, we would choose our APIs and related stage(s) that we wish to be associated with the usage plan. Please note that this is an optional step as you can opt not associate a specific API with your usage plan.
All that is left to do is add or create an API key for the usage plan. Again, it should be noted that this is also an optional step in creating your usage plan.

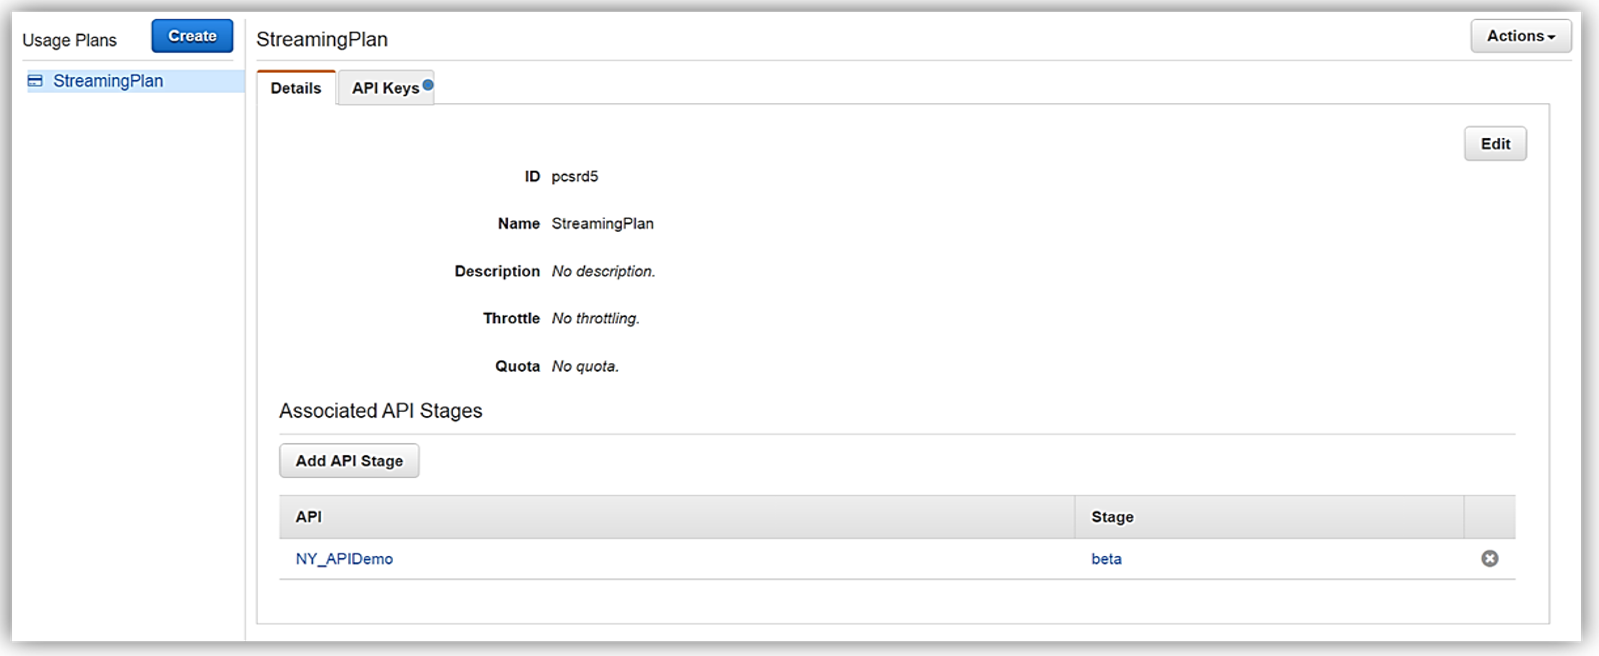
Now that we have our usage plan, StreamingPlan, we are ready for the next step in preparation for selling our API on the marketplace. You have the option to create multiple usage plans with varying APIs and limits, and sell these plans as differentiated API products on AWS Marketplace.
In order to enable customers to buy our new API product, however, the AWS Marketplace requires that each API product has an external developer portal to handle subscription requests, provide API information details and ability for the management of usage.
This customer need for an external developer portal for the marketplace birthed the new open source API Gateway developer portal serverless web application implementation. The goal of the API Gateway developer portal project was to allow customers to follow a few easy steps to create a serverless web application that lists a catalog of your APIs built with API Gateway while allowing for developer signups.
The API Gateway developer portal was built upon AWS Serverless Express; an open source library published by AWS which aids you in utilizing AWS Lambda and Amazon API Gateway in building web applications/services with the Node.js Express framework. Additionally, the API Gateway developer portal application uses an AWS SAM (Serverless Application Model) template to deploy its serverless resources. AWS SAM is a simplified CloudFormation template and specification that allows easier management and deployment of serverless applications on AWS.
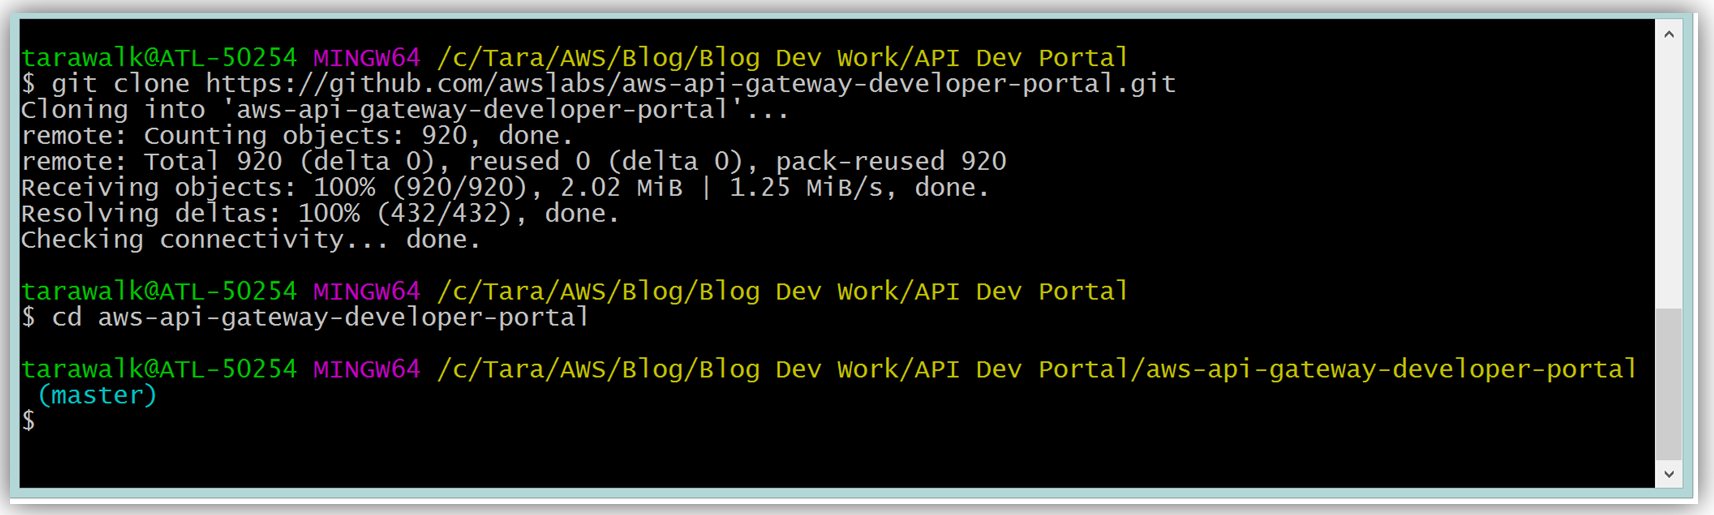
To build your developer portal using the API Gateway portal, you would start by cloning the aws-api-gateway-developer-portal project from GitHub.
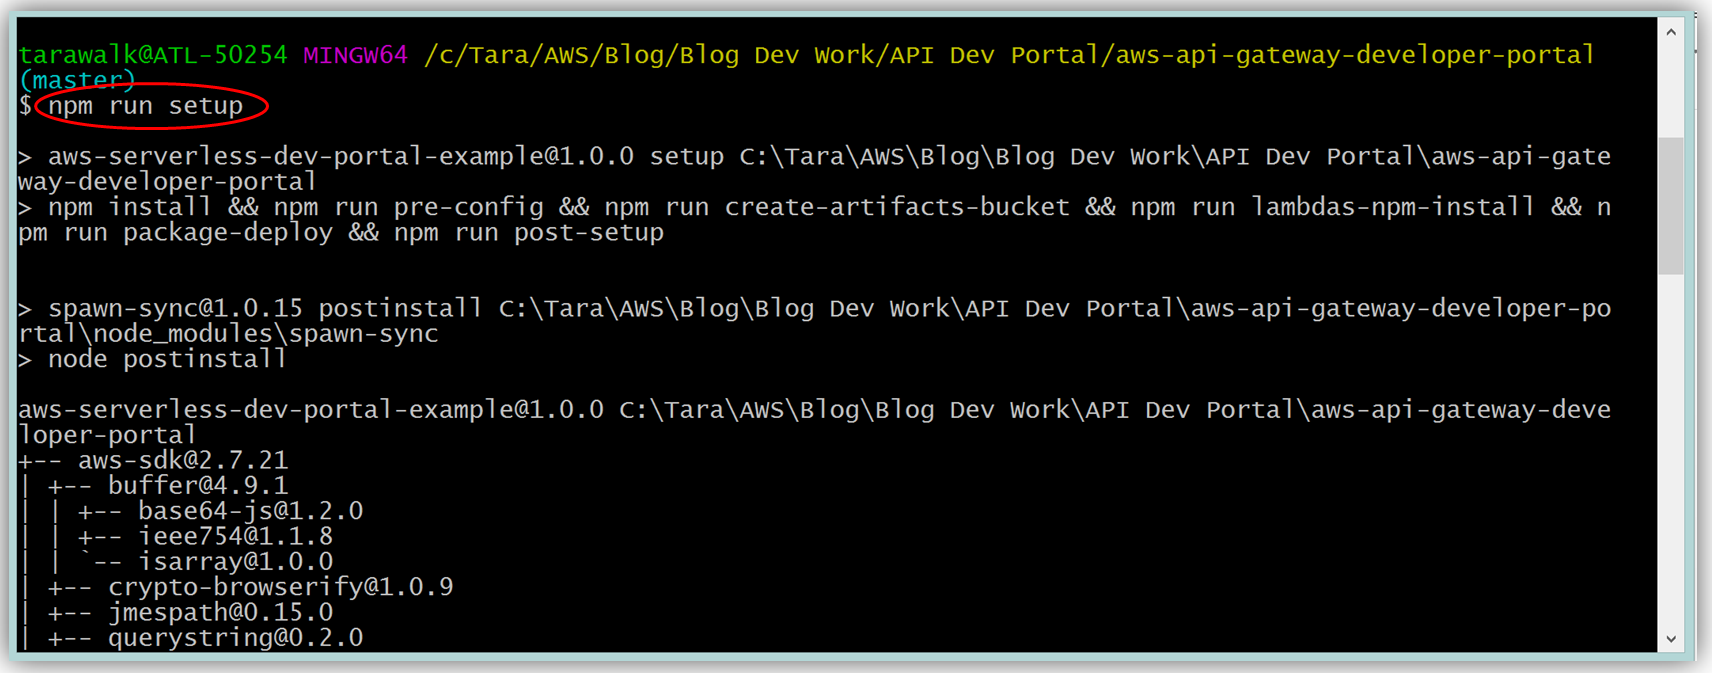
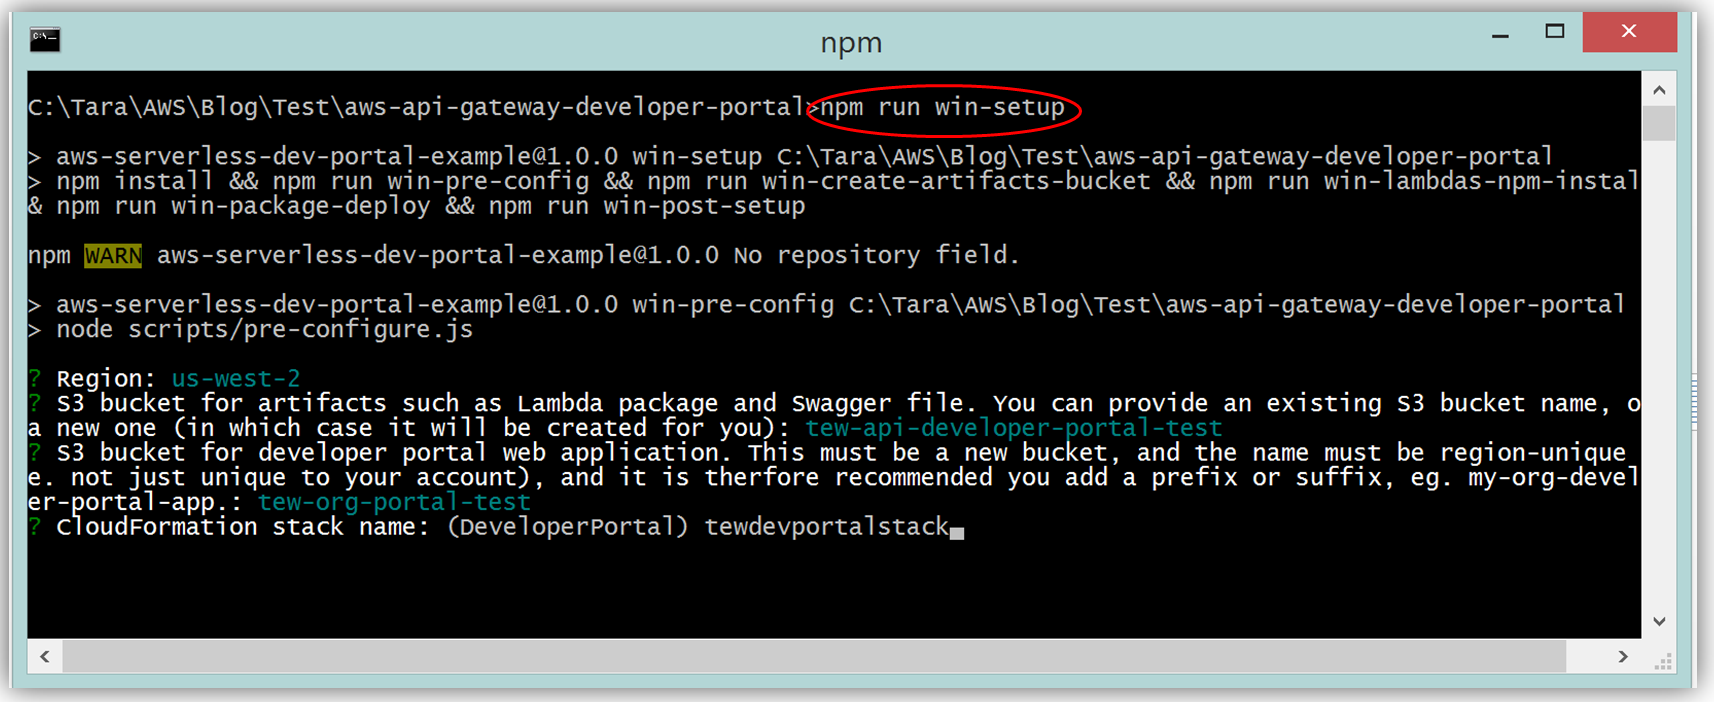
Assuming you have the latest version of the AWS CLI and Node.js installed, you would setup the developer portal by running “npm run setup” on the command line for Mac and Linux OS users. For Windows users, you would run “npm run win-setup” on the command line setup the developer portal.
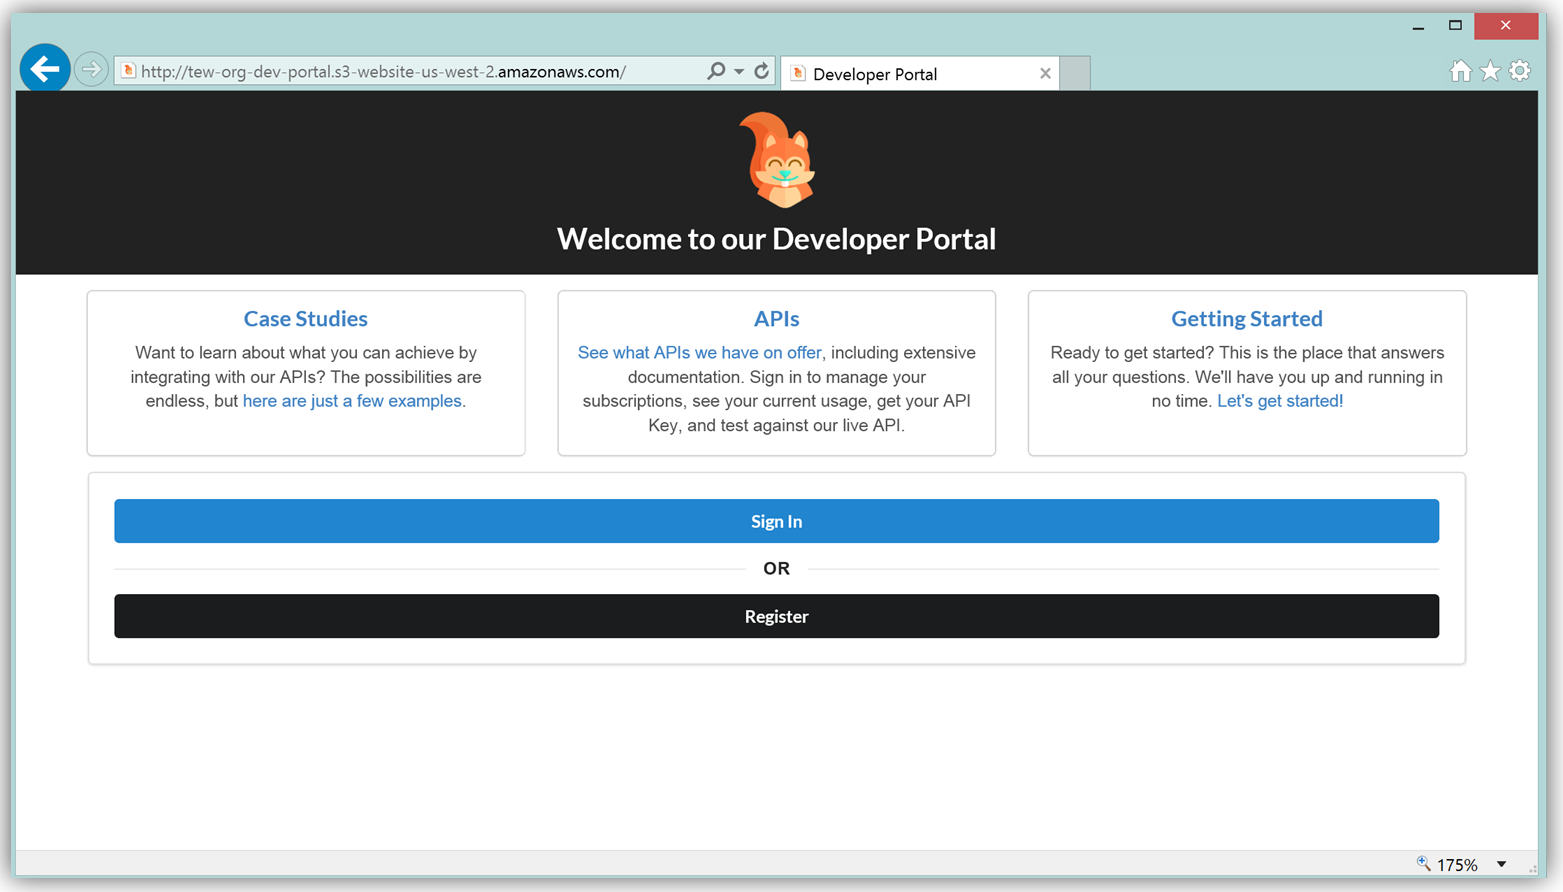
The result is a functional sample developer portal website running on S3 that you can customize in order to create your own developer portal for your APIs.
The frontend of the sample developer portal website is built with the React JavaScript library, and the backend is an AWS Lambda function running using the aws-serverless-express library. Additionally, a Lambda function with a SNS event source was created as a listener for notification when customers subscribe or unsubscribe to your API via the AWS Marketplace console. You can learn more about the steps to build, customize, and deploy your API Gateway developer portal web application with this reference project by visiting the AWS Compute blog post which discusses the architecture and implementation in more detail.
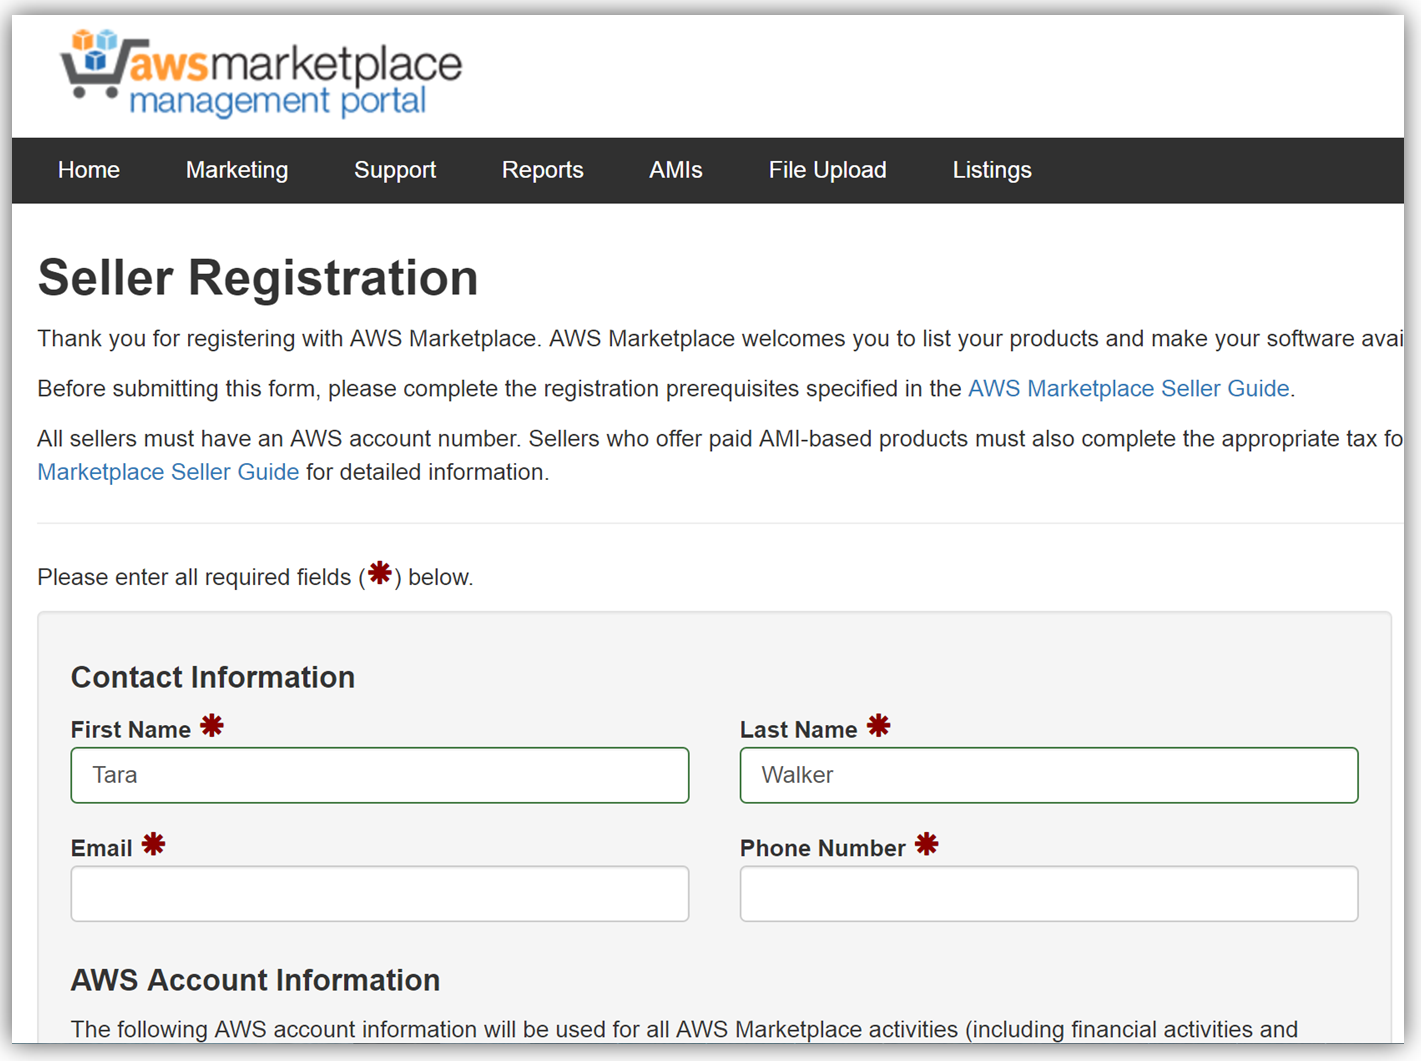
The next key step in monetizing our API is establishing an account on the AWS Marketplace. If an account is not already established, registering is simply verifying that you meet the requirement prerequisites provided in the AWS Marketplace Seller Guide and completing a seller registration form on the AWS Marketplace Management Portal. You can see a snapshot of the start of the seller registration form below.
To list the API, you would fill a product load form describing the API, establish the pricing for the API, and provide t\he IDs of AWS Accounts that will test the API subscription process. Completing this form would also require you to submit the URL for your API developer portal.
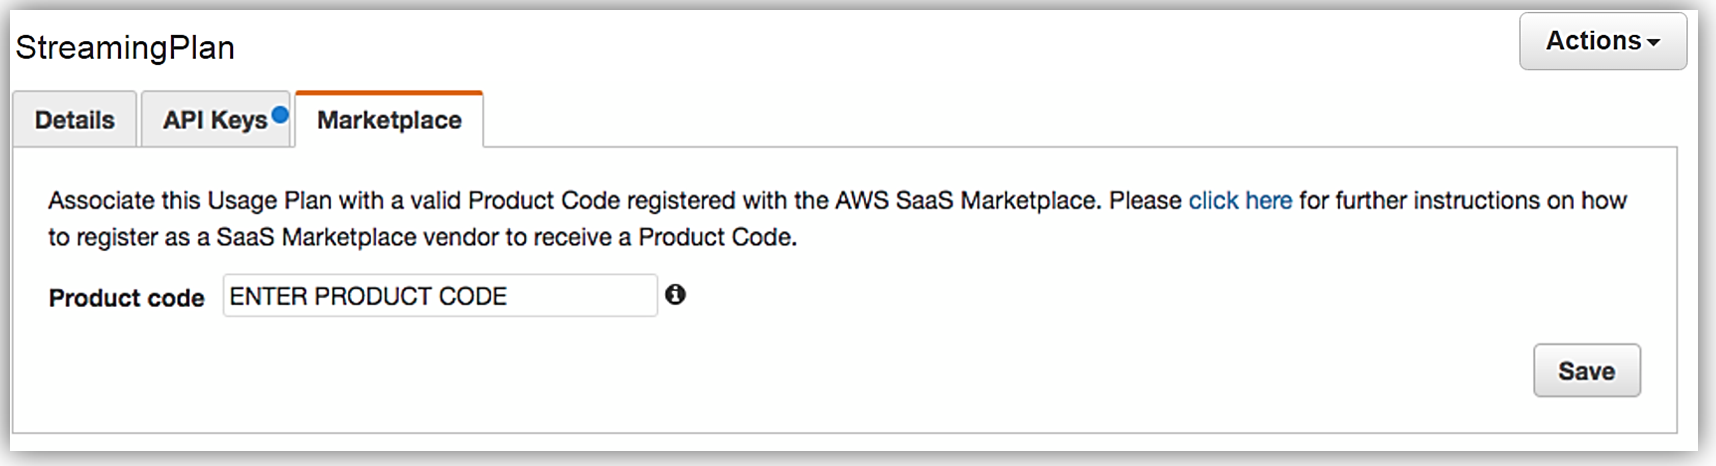
When your seller registration is complete, you will be supplied an AWS Marketplace product code. You will need to associate your marketplace product code with your API usage plan. In order to complete this step, you would simply log into the API Gateway console and go to your API usage plan. Go to the Marketplace tab and enter your product code. This tells API Gateway to send measurement data to AWS Marketplace when your API is used.
With your Amazon API Gateway managed API packaged into a usage plan, the accompanying API developer portal created, seller account registration completed, and product code associated with API usage plan; we are now ready to monetize our API on the AWS Marketplace.
Learn more about monetizing your APIs created with API Gateway by checking out the related blog post and reviewing the API Gateway developer guide documentation.
Summary
As you can see, the AWS teams were busy in 2016 working to make the customer experience easier for creating and deploying serverless architectures, as well as, providing mechanisms for customers to generate and monetize their API Gateway managed APIs.
Visit the product documentation for AWS Lambda and Amazon API Gateway to learn more about these services and all the newly released features.
– Tara