AWS Big Data Blog
Build and automate a serverless data lake using an AWS Glue trigger for the Data Catalog and ETL jobs
September 2022: This post was reviewed and updated with latest screenshots and instructions.
Today, data is flowing from everywhere, whether it is unstructured data from resources like IoT sensors, application logs, and clickstreams, or structured data from transaction applications, relational databases, and spreadsheets. Data has become a crucial part of every business. This has resulted in a need to maintain a single source of truth and automate the entire pipeline—from data ingestion to transformation and analytics— to extract value from the data quickly.
There is a growing concern over the complexity of data analysis as the data volume, velocity, and variety increases. The concern stems from the number and complexity of steps it takes to get data to a state that is usable by business users. Often data engineering teams spend most of their time on building and optimizing extract, transform, and load (ETL) pipelines. Automating the entire process can reduce the time to value and cost of operations. In this post, we describe how to create a fully automated data cataloging and ETL pipeline to transform your data.
Architecture
In this post, you learn how to build and automate the following architecture.

You build your serverless data lake with Amazon Simple Storage Service (Amazon S3) as the primary data store. Given the scalability and high availability of Amazon S3, it is best suited as the single source of truth for your data.
You can use various techniques to ingest and store data in Amazon S3. For example, you can use Amazon Kinesis Data Firehose to ingest streaming data. You can use AWS Database Migration Service (AWS DMS) to ingest relational data from existing databases. And you can use AWS DataSync to ingest files from an on-premises Network File System (NFS).
Ingested data lands in an Amazon S3 bucket that we refer to as the raw zone. To make that data available, you have to catalog its schema in the AWS Glue Data Catalog. You can do this using an AWS Lambda function invoked by an Amazon S3 trigger to start an AWS Glue crawler that catalogs the data. When the crawler is finished creating the table definition, you invoke a second Lambda function using an Amazon EventBridge Events rule. This step starts an AWS Glue ETL job to process and output the data into another Amazon S3 bucket that we refer to as the processed zone.
The AWS Glue ETL job converts the data to Apache Parquet format and stores it in the processed S3 bucket. You can modify the ETL job to achieve other objectives, like more granular partitioning, compression, or enriching of the data. Monitoring and notification is an integral part of the automation process. So as soon as the ETL job finishes, another EventBridge rule sends you an email notification using an Amazon Simple Notification Service (Amazon SNS) topic. This notification indicates that your data was successfully processed.
In summary, this pipeline classifies and transforms your data, sending you an email notification upon completion.
Deploy the automated data pipeline using AWS CloudFormation
First, you use AWS CloudFormation templates to create all of the necessary resources. This removes opportunities for manual error, increases efficiency, and ensures consistent configurations over time.
Launch the AWS CloudFormation template with the following Launch stack button.
Be sure to choose the US East (N. Virginia) Region (us-east-1). Then enter the appropriate stack name, email address, and AWS Glue crawler name to create the Data Catalog. Add the AWS Glue database name to save the metadata tables. Acknowledge the IAM resource creation as shown in the following screenshot, and choose Create.
Note: It is important to enter your valid email address so that you get a notification when the ETL job is finished.

This AWS CloudFormation template creates the following resources in your AWS account:
- Two Amazon S3 buckets to store both the raw data and processed Parquet data.
- Two AWS Lambda functions: one to create the AWS Glue Data Catalog and another function to publish topics to Amazon SNS.
- An Amazon Simple Queue Service (Amazon SQS) queue for maintaining the retry logic.
- An Amazon SNS topic to inform you that your data has been successfully processed.
- Two CloudWatch Events rules: one rule on the AWS Glue crawler and another on the AWS Glue ETL job.
- AWS Identity and Access Management (IAM) roles for accessing AWS Glue, Amazon SNS, Amazon SQS, and Amazon S3.
When the AWS CloudFormation stack is ready, check your email and confirm the SNS subscription. Choose the Resources tab and find the details.

Follow these steps to verify your email subscription so that you receive an email alert as soon as your ETL job finishes.
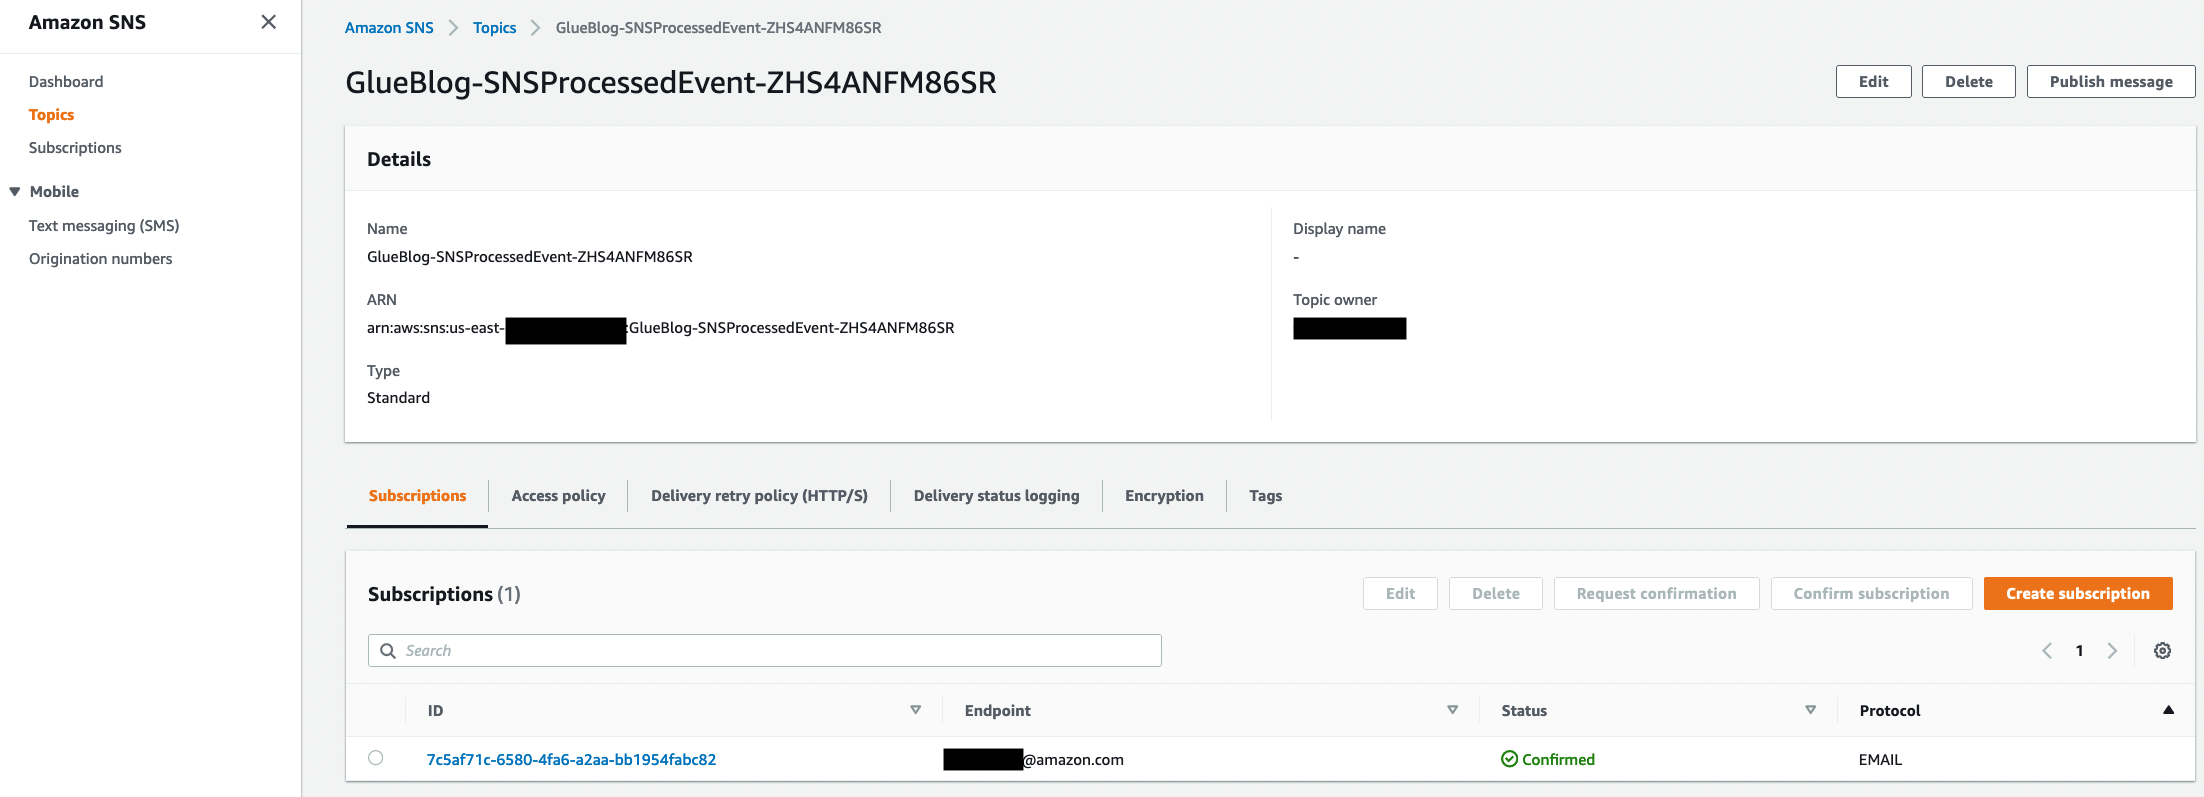
- On the Amazon SNS console, in the navigation pane, choose Topics. An SNS topic named SNSProcessedEvent appears in the display.

- Choose the ARN The topic details page appears, listing the email subscription as Pending confirmation. Be sure to confirm the subscription for your email address as provided in the Endpoint column.
If you don’t see an email address, or the link is showing as not valid in the email, choose the corresponding subscription endpoint. Then choose Request confirmation to confirm your subscription. Be sure to check your email junk folder for the request confirmation link.
Configure an Amazon S3 bucket event trigger
In this section, you configure a trigger on a raw S3 bucket. So when new data lands in the bucket, you trigger GlueTriggerLambda, which was created in the AWS CloudFormation deployment.
To configure notifications:
- Open the Amazon S3 console.
- Choose the source bucket. In this case, the bucket name contains raws3bucket, for example, <stackname>-raws3bucket-1k331rduk5aph.
- Go to the Properties tab, and under Advanced settings, choose Events.

- Create Event notification and configure a notification with the following settings:
- Event name– Enter a name of your choice. In this example, it is crawlerlambdaTrigger.
- Event typess– Select the All object create events check box to create the AWS Glue Data Catalog when you upload the file.
- Destination– Choose Lambda function.
- Specify Lambda Function– Choose the Lambda function that was created in the deployment section. Your Lambda function should contain the string GlueTriggerLambda.
See the following screenshots for all the settings. When you’re finished, choose Save changes.


For more details on configuring events, see How Do I Enable and Configure Event Notifications for an S3 Bucket? in the Amazon S3 Console User Guide.
Download the dataset
For this post, you use a publicly available New York green taxi dataset in CSV format. You upload monthly data to your raw zone and perform automated data cataloging using an AWS Glue crawler. After cataloging, an automated AWS Glue ETL job triggers to transform the monthly green taxi data to Parquet format and store it in the processed zone.
You can download the raw dataset from the NYC Taxi & Limousine Commission trip record data site. Download the yearly green taxi dataset and upload the file data. For example, upload the green taxi 2020 data to the raw S3 bucket (using above link).
Automate the Data Catalog with an AWS Glue crawler
One of the important aspects of a modern data lake is to catalog the available data so that it’s easily discoverable. To run ETL jobs or ad hoc queries against your data lake, you must first determine the schema of the data along with other metadata information like location, format, and size. An AWS Glue crawler makes this process easy.
After you upload the data into the raw zone, the Amazon S3 trigger that you created earlier in the post invokes the GlueTriggerLambdafunction. This function creates an AWS Glue Data Catalog that stores metadata information inferred from the data that was crawled.
Open the AWS Glue console. You should see the database, table, and crawler that were created using the AWS CloudFormation template. Your AWS Glue crawler should appear as follows.

Browse to the table using the left navigation, and you will see the table in the database that you created earlier.

Choose the table name, and further explore the metadata discovered by the crawler, as shown following.

You can also view the columns, data types, and other details. In following screenshot, Glue Crawler has created schema from files available in Amazon S3 by determining column name and respective data type. You can use this schema to create external table.

Author ETL jobs with AWS Glue
AWS Glue provides a managed Apache Spark environment to run your ETL job without maintaining any infrastructure with a pay as you go model.
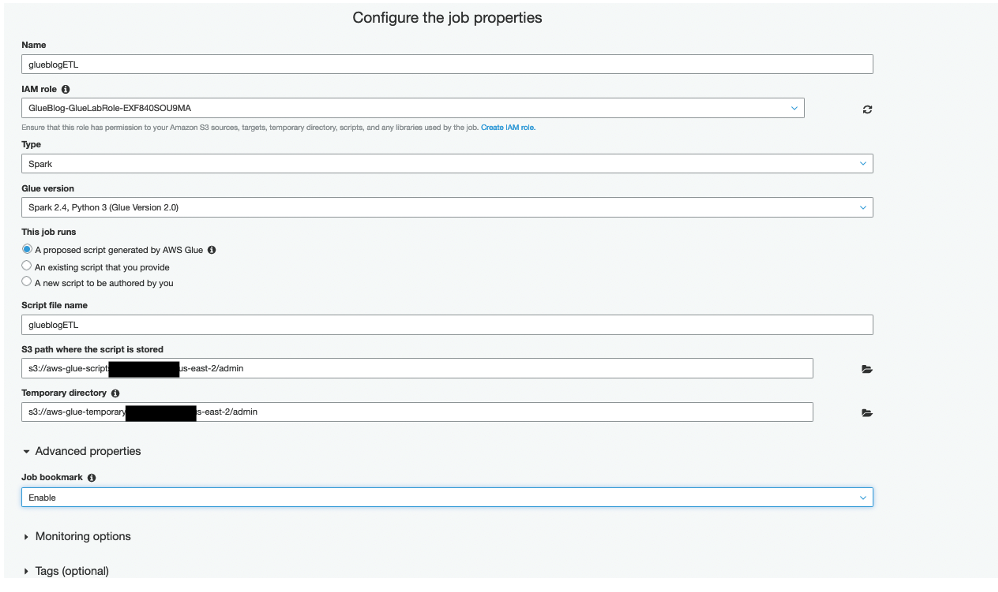
Open the AWS Glue console and choose Jobs under the ETL section to start authoring an AWS Glue ETL job. Give the job a name of your choice, and note the name because you’ll need it later. Choose the already created IAM role with the name containing <stackname>– GlueLabRole, as shown following. Keep the other default options.
AWS Glue generates the required Python or Scala code, which you can customize as per your data transformation needs. In the Advanced properties section, choose Enable in the Job bookmark list to avoid reprocessing old data.
On the next page, choose your raw Amazon S3 bucket as the data source, and choose Next. On the Data target page, choose the processed Amazon S3 bucket as the data target path, and choose Parquet as the Format.


On the next page, you can make schema changes as required, such as changing column names, dropping ones that you’re less interested in, or even changing data types. AWS Glue generates the ETL code accordingly.
Once done, choose Save Job and Edit Script, as shown following.
On the next page, you can modify the script further as per your data transformation requirements. For this post, you can leave the script as is. In the next section, you automate the execution of this ETL job.
Automate ETL job execution
As the frequency of data ingestion increases, you will want to automate the ETL job to transform the data. Automating this process helps reduce operational overhead and free your data engineering team to focus on more critical tasks.
AWS Glue is optimized for processing data in batches. You can configure it to process data in batches on a set time interval. How often you run a job is determined by how recent the end user expects the data to be and the cost of processing. For information about the different methods, see Triggering Jobs in AWS Glue in the AWS Glue Developer Guide.
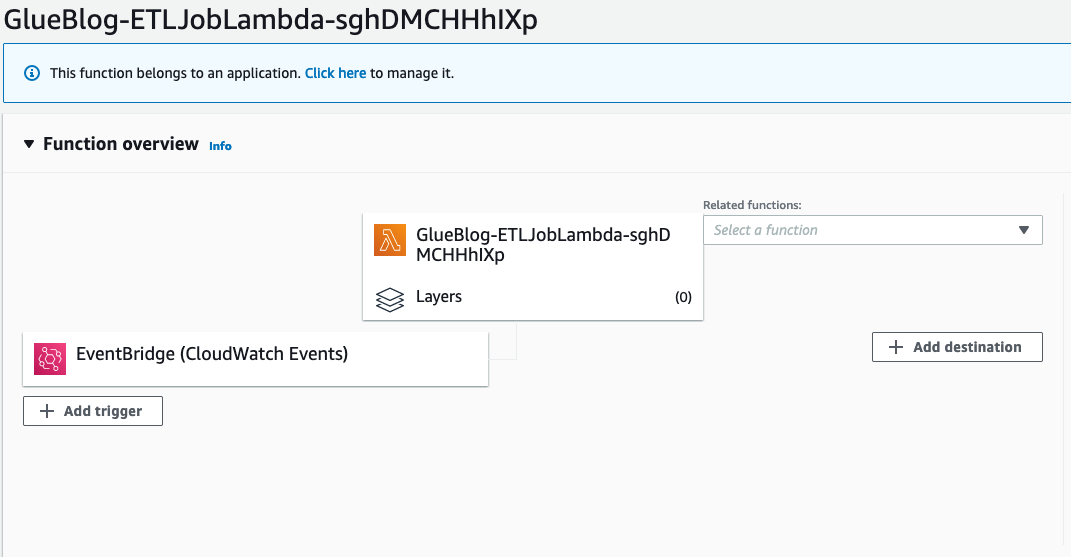
First, you need to make one-time changes and configure your ETL job name in the Lambda function and the CloudWatch Events rule. On the console, open the ETLJobLambda Lambda function, which was created using the AWS CloudFormation stack.

Choose the Lambda function link that appears, and explore the code. Change the JobName value to the ETL job name that you created in the previous step, and then choose Save.

As shown in in the following screenshot, you will see an AWS CloudWatch Events rule CrawlerEventRule that is associated with an AWS Lambda function. When the CloudWatch Events rule receives a success status, it triggers the ETLJobLambda Lambda function.
Now you are all set to trigger your AWS Glue ETL job as soon as you upload a file in the raw S3 bucket. Before testing your data pipeline, set up the monitoring and alerts.
Monitoring and notification with Amazon CloudWatch Events
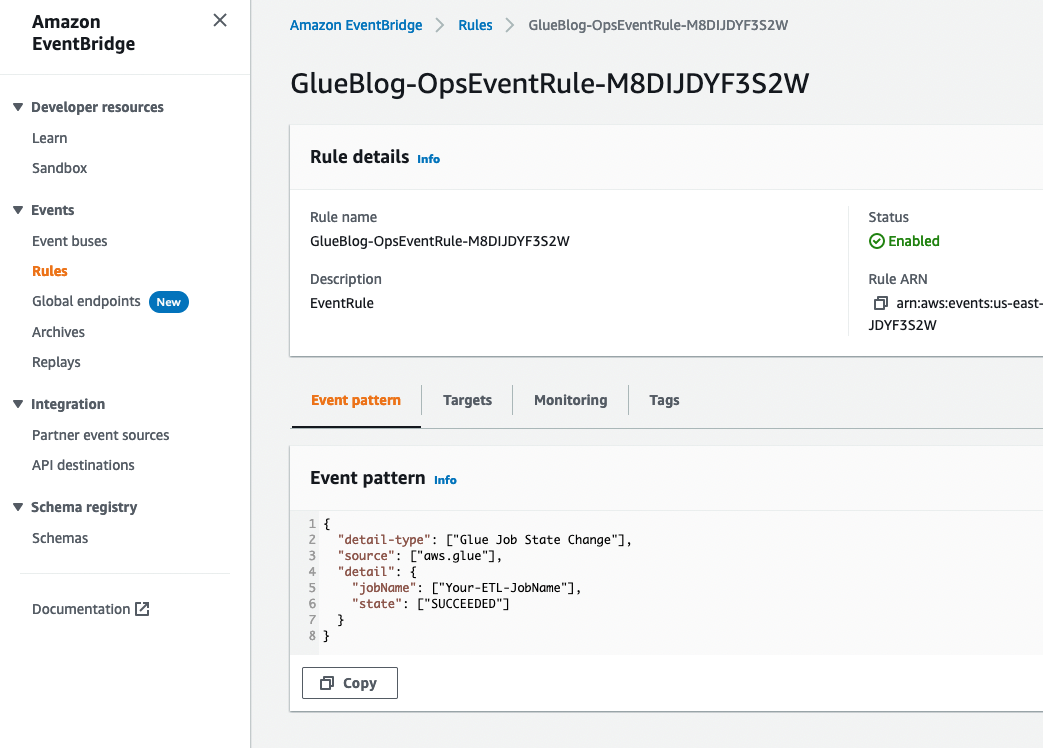
Suppose that you want to receive a notification over email when your AWS Glue ETL job is completed. To achieve that, the CloudWatch Events rule OpsEventRule was deployed from the AWS CloudFormation template in the data pipeline deployment section. This CloudWatch Events rule monitors the status of the AWS Glue ETL job and sends an email notification using an SNS topic upon successful completion of the job.
As the following image shows, you configure your AWS Glue job name in the Event pattern section in CloudWatch. The event triggers an SNS topic configured as a target when the AWS Glue job state changes to SUCCEEDED. This SNS topic sends an email notification to the email address that you provided in the deployment section to receive notification.

Let’s make one-time configuration changes in the Amazon EventBridge rule OpsEventRule to capture the status of the AWS Glue ETL job.
- Open the EventBridge console.
- In the navigation pane, under Events, choose Rules. Choose the rule name that contains OpsEventRule, as shown following.

- In the upper-right corner, choose Actions, Edit. You will see the below window.
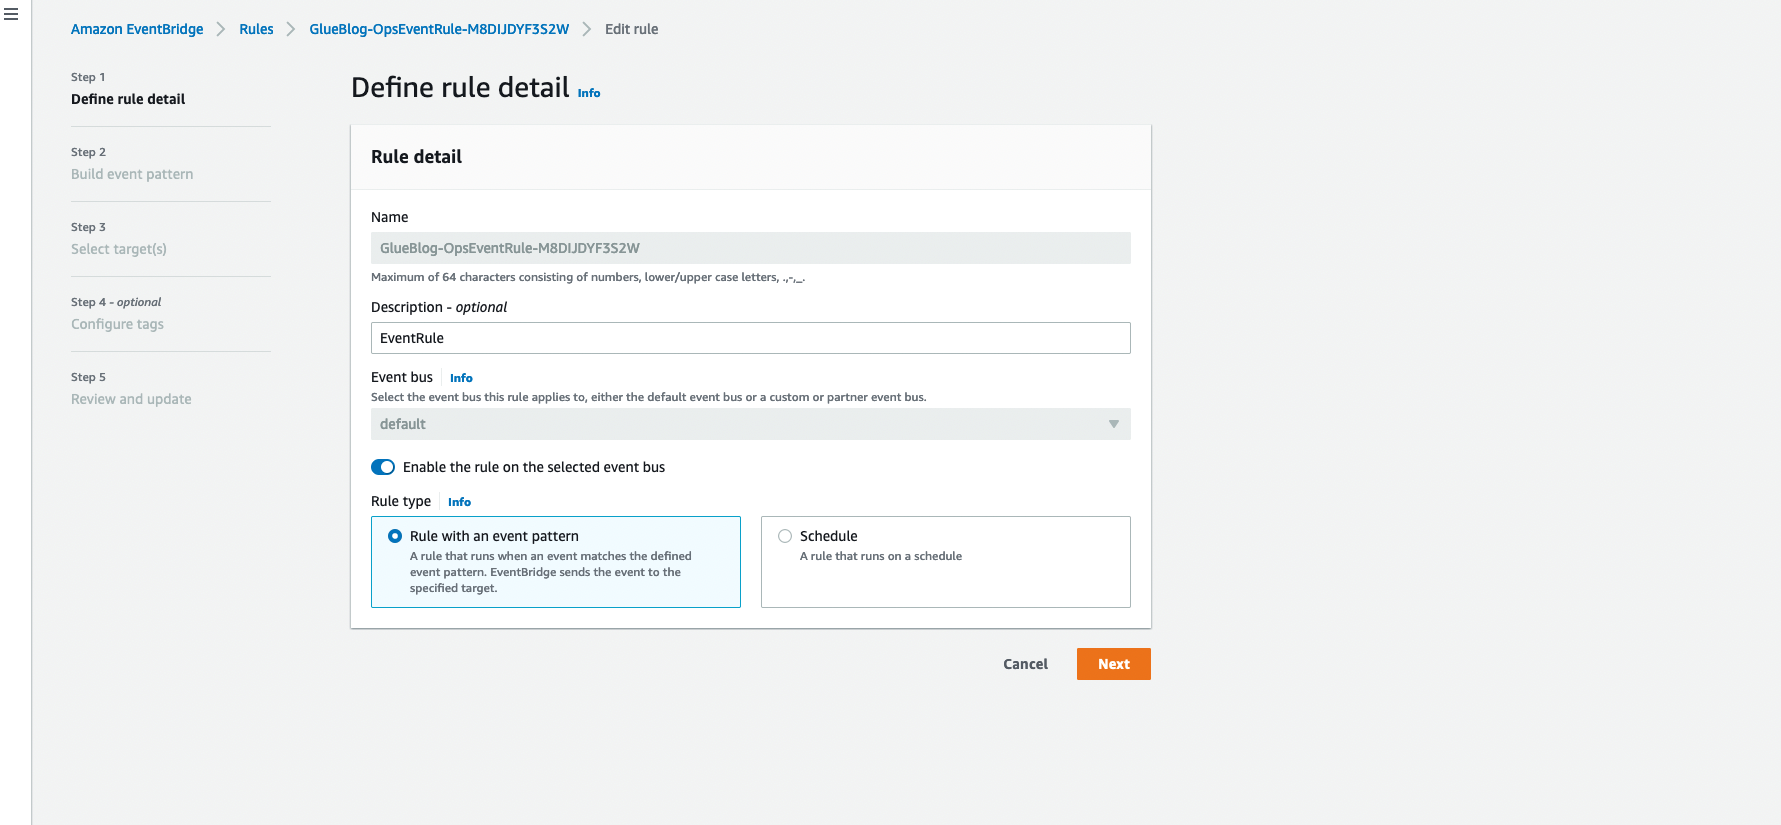
- Replace Your-ETL-jobName with the ETL job name that you created in the previous step.

- Now you will see the Select Target screen. Make sure you have SNSProcessedEvent SNS topic selected.

- Review your changes and choose Update rule.

Now that you have set up an entire data pipeline in an automated way with the appropriate notifications and alerts, it’s time to test your pipeline. If you upload new data to the raw Amazon S3 bucket (for example, upload the NY green taxi 2021 CSV), it triggers the GlueTriggerLambda AWS Lambda function. You can navigate to the AWS Glue console, where you can see that the AWS Glue crawler is running.
Upon completion of the crawler, the CloudWatch Events rule CrawlerEventRule triggers your ETLJobLambda Lambda function. You can notice now that the AWS Glue ETL job is running.
When the ETL job is successful, the CloudWatch Events rule OpsEventRule sends an email notification to you using an Amazon SNS topic, as shown following, hence completing the automation cycle.

Be sure to check your processed Amazon S3 bucket, where you will find transformed data processed by your automated ETL pipeline. Now that the processed data is ready in Amazon S3, you need to run the AWS Glue crawler on this Amazon S3 location. The crawler creates a metadata table with the relevant schema in the AWS Glue Data Catalog.
After the Data Catalog table is created, you can execute standard SQL queries using Amazon Athena and visualize the data using Amazon QuickSight. To learn more, see the blog post Harmonize, Query, and Visualize Data from Various Providers using AWS Glue, Amazon Athena, and Amazon QuickSight
Conclusion
Having an automated serverless data lake architecture lessens the burden of managing data from its source to destination—including discovery, audit, monitoring, and data quality. With an automated data pipeline across organizations, you can identify relevant datasets and extract value much faster than before. The advantage of reducing the time to analysis is that businesses can analyze the data as it becomes available in real time. From the BI tools, queries return results much faster for a single dataset than for multiple databases.
Business analysts can now get their job done faster, and data engineering teams can free themselves from repetitive tasks. You can extend it further by loading your data into a data warehouse like Amazon Redshift or making it available for machine learning via Amazon SageMaker.
Additional resources
See the following resources for more information:
- How to build a front-line concussion monitoring system using AWS IoT and serverless data lakes
- Orchestrate multiple ETL jobs using AWS Step Functions and AWS Lambda
About the authors
 Saurabh Shrivastava is a partner solutions architect and big data specialist working with global systems integrators. He works with AWS partners and customers to provide them with architectural guidance for building scalable architecture in hybrid and AWS environments. He enjoys spending time with his family outdoors and traveling to new destinations to discover new cultures.
 Ashutosh Dubey is a Senior Partner Solutions Architect at Amazon Web Services (AWS) based out of New Jersey, USA. He has 16+ years of experience specializing in the Data and Analytics field, and has helped Fortune 500 companies in their cloud journey to AWS.
 Luis Lopez Soria is a partner solutions architect and serverless specialist working with global systems integrators. He works with AWS partners and customers to help them with adoption of the cloud operating model at a large scale. He enjoys doing sports in addition to traveling around the world exploring new foods and cultures.
 Chirag Oswal is a partner solutions architect and AR/VR specialist working with global systems integrators. He works with AWS partners and customers to help them with adoption of the cloud operating model at a large scale. He enjoys video games and travel.