AWS Big Data Blog
Harmonize, Query, and Visualize Data from Various Providers using AWS Glue, Amazon Athena, and Amazon QuickSight
Have you ever been faced with many different data sources in different formats that need to be analyzed together to drive value and insights? You need to be able to query, analyze, process, and visualize all your data as one canonical dataset, regardless of the data source or original format.
In this post, I walk through using AWS Glue to create a query optimized, canonical dataset on Amazon S3 from three different datasets and formats. Then, I use Amazon Athena and Amazon QuickSight to query against that data quickly and easily.
AWS Glue overview
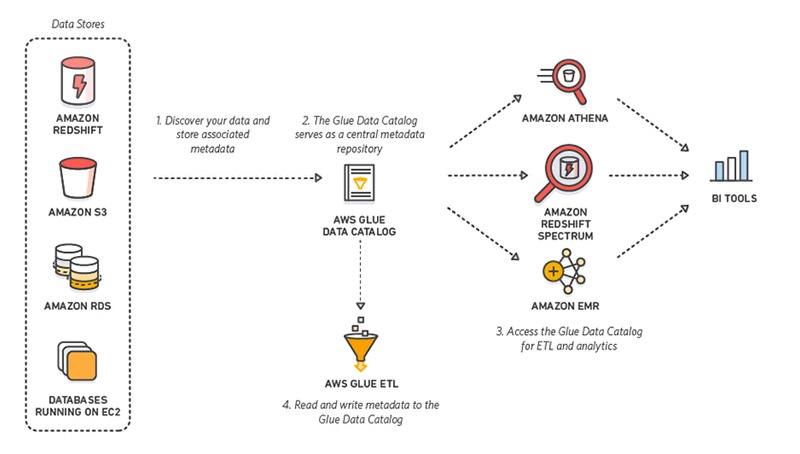
AWS Glue is a fully managed extract, transform, and load (ETL) service that makes it easy for customers to prepare and load their data for query and analytics. You can create and run an ETL job with a few clicks in the AWS Management Console. Point AWS Glue to your data stored on AWS, and a crawler discovers your data, classifies it, and stores the associated metadata (such as table definitions) in the AWS Glue Data Catalog. After it’s cataloged, your data is immediately searchable, queryable, and available for ETL. AWS Glue generates the ETL code for data transformation, and loads the transformed data into a target data store for analytics.
The AWS Glue ETL engine generates Python code that is entirely customizable, reusable, and portable. You can edit the code using your favorite IDE or notebook and share it with others using GitHub. After your ETL job is ready, you can schedule it to run on the AWS Glue fully managed, scale-out Spark environment, using its flexible scheduler with dependency resolution, job monitoring, and alerting.
AWS Glue is serverless. It automatically provisions the environment needed to complete the job, and customers pay only for the compute resources consumed while running ETL jobs. With AWS Glue, data can be available for analytics in minutes.
Walkthrough
During this post, I step through an example using the New York City Taxi Records dataset. I focus on one month of data, but you could easily do this for the entire eight years of data. At the time of this post, AWS Glue is available in US-East-1 (N. Virginia).
As you crawl the unknown dataset, you discover that the data is in different formats, depending on the type of taxi. You then convert the data to a canonical form, start to analyze it, and build a set of visualizations… all without launching a single server.
Discover the data
To analyze all the taxi rides for January 2016, you start with a set of data in S3. First, create a database for this project within AWS Glue. A database is a set of associated table definitions, organized into a logical group. In Athena, database names are all lowercase, no matter what you type.

Next, add a new crawler and have it infer the schemas, structure, and other properties of the data.
- Under Crawlers, choose Add crawler.
- For Name, type “NYCityTaxiCrawler”.
- Choose an IAM role that AWS Glue can use for the crawler. For more information, see the AWS Glue Developer Guide.
- For Data store, type S3.
- For Crawl data in, choose Specified path in another account.
- For Include path, type “s3://serverless-analytics/glue-blog”.
- For Add Another data store, choose No.
- For Frequency, choose On demand. This allows you to customize when the crawler runs.
- Configure the crawler output database and prefix:
- For Database, select the database created earlier, “nycitytaxianalysis”.
- For Prefix added to tables (optional), type “blog_”.
- Choose Finish and Run it now.

The crawler runs and indicates that it found three tables.
![]()
If you look under Tables, you can see the three new tables that were created under the database “nycitytaxianalysis”.

The crawler used the built-in classifiers and identified the tables as CSV, inferred the columns/data types, and collected a set of properties for each table. If you look in each of those table definitions, you see the number of rows for each dataset found and that the columns don’t match between tables. As an example, bringing up the blog_yellow table, you can see the yellow dataset for January 2017 with 8.7 million rows, the location on S3, and the various columns found.

Optimize queries and get data into a canonical form
Create an ETL job to move this data into a query-optimized form. In a future post, I’ll cover how to partition the query-optimized data. You convert the data into a column format, changing the storage type to Parquet, and writing the data to a bucket that you own.
- Create a new ETL job and name it NYCityTaxiYellow.
- Select an IAM role that has permissions to write to a new S3 location in a bucket that you own.
- Specify a location for the script and tmp space on S3.
- Choose the blog_yellow table as a data source.
- Specify a new location (a new prefix location without any existing objects) to store the results.

- In the transform, rename the pickup and dropoff dates to be generic fields. The raw data actually lists these fields differently and you should use a common name. To do this, choose the target column name and retype the new field name.

Also, change the data types to be time stamps rather than strings. The following table outlines the updates.Old Name Target Name Target Data Type tpep_pickup_datetime pickup_date timestamp tpep_dropoff_datetime dropoff_date timestamp - Choose Next and Finish.
In this case, AWS Glue creates a script. You could also start with a blank script or provide your own.

Because AWS Glue uses Apache Spark behind the scenes, you can easily switch from an AWS Glue DynamicFrame to a Spark DataFrame and do advanced operations within Apache Spark. Just as easily, you can switch back and continue to use the transforms and tables from the catalog.
To show this, convert to a DataFrame and add a new field column indicating the type of taxi. Make the following custom modifications in PySpark.
Add the following header:
Find the last call before the the line that start with the datasink. This is the dynamic frame that is being used to write out the data.
Let’s now convert that to a DataFrame. Please replace the <DYNAMIC_FRAME_NAME> with the name generated in the script.
In the last datasink call, change the dynamic frame to point to the new custom dynamic frame created from the Spark DataFrame:
Save and run the ETL.


To use AWS Glue with Athena, you must upgrade your Athena data catalog to the AWS Glue Data Catalog. Without the upgrade, tables and partitions created by AWS Glue cannot be queried with Athena. As of August 14, 2017, the AWS Glue Data Catalog is only available in US-East-1 (N. Virginia). Start the upgrade in the Athena console. For more information, see Integration with AWS Glue in the Amazon Athena User Guide.
Next, we’ll go into Athena and create a table there for the new data format. This shows how you can interact with the data catalog either through Glue or the Athena.
- Go into the Athena Web Console
- Select the nycitytaxianalysis database
- Run the following create statement:
Note: The table properties are important for Glue ETL to know the destination format. More details can be found here: http://docs.aws.amazon.com/athena/latest/ug/glue-athena.html#creating-tables-using-ate-for-aws-glue-etl-jobs
Within the Glue Data Catalog, select the new table that you created through Athena under Actions, select “View data”.

If you do a query on the count per type of taxi, you notice that there is only “yellow” taxi data in the canonical location. Convert “green” and “fhv” data:

In the AWS Glue console, create a new ETL job named “NYCityTaxiGreen”. Choose blog_green as the source and the new canonical location as the target. Choose the new pickup_date and dropoff_date fields for the target field types for the date variables, as shown below.

In the script, insert the following two lines at the end of the top imports:
Find the last call before the the line that start with the datasink. This is the dynamic frame that is being used to write out the data.
Let’s now convert that to a DataFrame. Please replace the <DYNAMIC_FRAME_NAME> with the name generated in the script.
In the last datasink call, change the dynamic frame to point to the new custom dynamic frame created from the Spark DataFrame. To do this, modify the variable that is being passed into the frame parameter for the last datasink call. The parameter pass should look like this ‘frame = customDynamicFrame’.
Notice that it matches the last line in the commands that you pasted earlier. After the ETL job finishes, you can require the count per type through Athena and see the sizes:

What you have done is taken two datasets that contained taxi data in different formats and converted them into a single, query-optimized format. That format can easily be consumed by various analytical tools, including Athena, EMR, and Redshift Spectrum. You’ve done all of this without launching a single server.
You have one more dataset to convert, so create a new ETL job for that. Name the job “NYCityTaxiFHV”. This dataset is limited as it only has three fields, one of which you are converting. Choose “–” (dash) for the dispatcher and location, and map the pickup date to the canonical field.

In the script, insert the following two lines at the end of the top imports:
Find the last call before the the line that start with the datasink. This is the dynamic frame that is being used to write out the data.
Let’s now convert that to a DataFrame. Please replace the <DYNAMIC_FRAME_NAME> with the name generated in the script.
In the last datasink call, change the dynamic frame to point to the new custom dynamic frame created from the Spark DataFrame. To do this, modify the variable that is being passed into the frame parameter for the last datasink call. The parameter pass should look like this ‘frame = customDynamicFrame’.
After the third ETL job completes, you can query the single dataset, in a query-optimized form on S3:

Query across the data with Athena
Here’s a query:
Within a second or two, you can quickly see the ranges for these values.

You can see some outliers in the total amount and distances that are = 0. In the next query, don’t include those when calculating things like average cost per mile:

Interesting note: you aren’t seeing FHV broken out yet, because that dataset didn’t have a mapping to these fields. Here’s a query that’s a little more complicated, to calculate a 99th percentile:

Visualizing the data in QuickSight
Amazon QuickSight is a data visualization service you can use to analyze the data that you just combined. For more detailed instructions, see the Amazon QuickSight User Guide.
- Create a new Athena data source, if you haven’t created one yet.
- Create a new dataset for NY taxi data, and point it to the canonical taxi data.
- Choose Edit/Preview data.
- Add a new calculated field named HourOfDay.

- Choose Save and Visualize.
You can now visualize this dataset and query through Athena the canonical dataset on S3 that has been converted by AWS Glue. Selecting HourOfDay allows you to see how many taxi rides there are based on the hour of the day. This is a calculated field that is being derived by the time stamp in the raw dataset.

You can also deselect that and choose type to see the total counts again by type.

Now choose the pickup_date field in addition to the type field and notice that the plot type automatically changed. Because time is being used, it’s showing a time chart defaulting to the year. Choose a day interval instead.

Expand the x axis to zoom out. You can clearly see a large drop in all rides on January 23, 2016.

Summary
In the post, you went from data investigation to analyzing and visualizing a canonical dataset, without starting a single server. You started by crawling a dataset you didn’t know anything about and the crawler told you the structure, columns, and counts of records.
From there, you saw that all three datasets were in different formats, but represented the same thing: NY City Taxi rides. You then converted them into a canonical (or normalized) form that is easily queried through Athena and QuickSight, in addition to a wide number of different tools not covered in this post.
If you have questions or suggestions, please comment below.
Additional Reading
Learn how to harmonize, search, and analyze loosely coupled datasets on AWS.

About the Author
 Ben Snively is a Public Sector Specialist Solutions Architect. He works with government, non-profit and education customers on big data and analytical projects, helping them build solutions using AWS. In his spare time he adds IoT sensors throughout his house and runs analytics on it.