AWS Big Data Blog
Integrate and deduplicate datasets using AWS Lake Formation FindMatches
AWS Lake Formation FindMatches is a new machine learning (ML) transform that enables you to match records across different datasets as well as identify and remove duplicate records, with little to no human intervention. FindMatches is part of Lake Formation, a new AWS service that helps you build a secure data lake in a few simple steps.
To use FindMatches, you don’t have to write code or know how ML works. Your data doesn’t have to include a unique identifier, nor must fields match exactly.
FindMatches helps you with the following:
- Match customers: Link and integrate customer records across different datasets, even where fields do not match exactly (for example, due to different name spellings, address differences, and missing or inaccurate data).
- Match products: Match products across different vendor catalogs and SKUs. You can do this even when records do not share a common structure.
- Prevent fraud: Identify potentially fraudulent accounts compared to previously known bad actors.
- Match other data: Match addresses, movies, parts lists, etc. In general, if a human being could look at your database rows and determine that they were a match, there’s a good chance that FindMatches can help you.
In this post, you learn how to use the FindMatches ML transform to identify matching records in a scholarly dataset that consists of two lists of academic publications: DBLP and Scholar. This dataset is based on the DBLP-Scholar Dataset described in “Evaluation of entity resolution approaches on real-world match problems” (Köpcke, H., Thor, A., Rahm, E.). This work is licensed under a Creative Commons Attribution 4.0 International License.
We’ve combined the DBLP and Scholar datasets into a single file with a new column that indicates the source of each record, and provided a label file (the “perfect mapping”) in a format compatible with FindMatches.
Overview
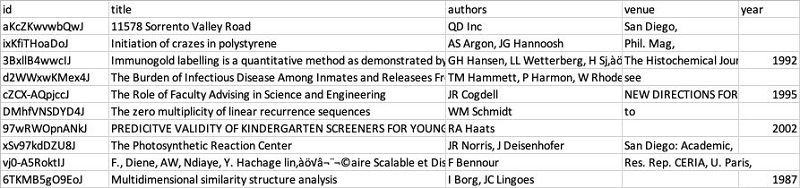
The following example of the DBLP and Scholar data shows how it’s structured. The DBLP data includes 2,616 records, structured as shown in the following table.

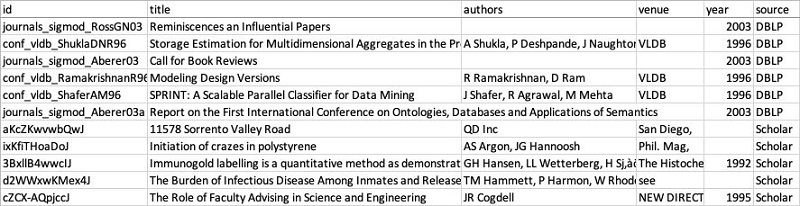
The Scholar data includes 64,263 records. It has a similar structure, but the data is messier. For instance, it has missing entries, incorrect values (for example, an address in the title field), and includes unexpected characters.
As you can see, although the DBLP and Scholar lists include similar and overlapping data, they do not share a common identifier. Also, the publication titles, authors, venues, and years do not always match. Integrating the data can be challenging and time-consuming—here’s how to use FindMatches to make it easier.
First, put the data into a format that FindMatches can use. The tool operates on data in a single table. To identify each record’s original dataset, combine both lists into a single table and add a “source” column. To avoid compatibility issues, replace all “/” characters in the “id” field with “_” and convert it to JSON. The resulting ready-to-use input file is available at the following location:
s3://ml-transforms-public-datasets-us-east-1/dblp-scholar/records/dblp_scholar_records.jsonl
If you are following this tutorial in another Region, replace “us-east-1” in this and other URLs mentioned in this post with your Region.
Before you walk through the FindMatches ML Transform, the following table is a sneak peek of what you’re working to achieve. Once you match datasets, the resulting table mirrors the input table’s structure and data but adds a match_id column. Matched records display the same match_id value.

Walkthrough
This section breaks down the entire matching process from beginning to end. At a high level, the matching process includes the following steps:
- Catalog your data with the AWS Glue Data Catalog.
- Create a new FindMatches ML transform for your data.
- Teach FindMatches by providing labeling examples of matching and non-matching records.
- Review match quality metrics and upload more labels if match quality is not yet sufficient.
- Create an AWS Glue ETL job that uses your FindMatches transform.
- Review the output.
Catalog your data using AWS Glue crawlers
FindMatches operates on tables defined in the AWS Glue Data Catalog. Use the AWS Glue crawlers to discover and catalog the data. To learn how to use crawlers to add tables to your AWS Glue Data Catalog, see Using crawlers.
FindMatches uses only numerical, string, and string array columns in matching. It ignores columns of other data types, for example, dates or structs. Does your table in AWS Glue Data Catalog include columns of other data types that you believe are important for determining if records are a match? Create a new column that’s a numerical or a string version of the original column.
Create a FindMatches ML transform
- In the AWS Glue console, in the left navigation pane, under Jobs, choose ML Transforms, and then choose Add transform, as shown in the following screenshot.

- On the next page, enter a name, select or create an IAM role that includes AWSGlueServiceRole and AmazonS3FullAccess policies, and then choose Next. For more information, see Create an IAM Role for AWS Glue.

- On the next page, choose dblp_scholar_records_jsonl as the data source. Your AWS Glue crawler created this table while discovering the dataset.

- On the following page, select id as the primary key. The primary key should be a unique identifier. It establishes an unambiguous relationship between the label file entries and the records in your dataset.

- On the Tune transform page, adjust the balance between Recall and Precision, and between Lower cost and Accuracy.
Moving the slider closer toward Precision tells your transform that it must have a higher level of confidence to identify records as a “match”. But by using higher-confidence settings, you risk missing some actual matches that had lower algorithm confidence. Moving the slider toward Recall relaxes the matching confidence threshold, resulting in more actual matches identified. But this choice risks identifying some non-matches as matches. As you can see, there are trade-offs in either direction.
The choice of precision or recall depends on your business case. For example, when you are identifying job candidates to interview, you aim for higher recall. You want to include potential matches but not accidentally reject a good candidate. But when you make the hiring decision, you aim for high precision—hiring the candidate only when you have high confidence that they are right for the job.
The Lower Cost vs. Accuracy slider controls how many records your transform compares to determine if they are a match. For large datasets, it is not feasible to compare every single record to every other record. FindMatches uses an advanced algorithm to identify subsets of likely matching records for deeper comparison. The higher Accuracy setting helps achieve higher recall, at the expense of a longer runtime (and thus cost) necessary to compare more records.
To achieve the best results for this particular dataset, set the Recall vs. Precision slider 0.9 toward Precision. Set the Lower Cost vs. Accuracy slider all the way to Accuracy. If needed, you can later tweak these values by selecting the transform and using the Tune menu.

Review your selection, and then choose Finish to create your transform.
Teach FindMatches using labeled data
Now that you’ve created the transform, you teach it (or “train it,” as an ML expert would say) to recognize matching and non-matching records. You do that by providing labeled data—examples of matching and non-matching input records.
The labeled data file that you use in this example is the following:
s3://ml-transforms-public-datasets-us-east-1/dblp-scholar/labels/dblp_scholar_labels_350.csv
If you’re using FindMatches from a Region other than us-east-1, replace us-east-1 with your Region in the file URL.
This file is fully ready for consumption. However, let’s go a little deeper into its structure, so that you know how to prepare and label data for your matching projects.
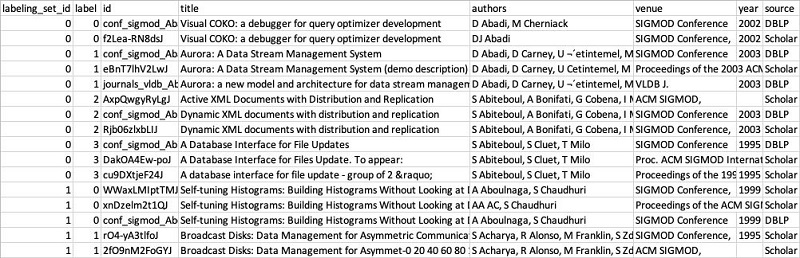
As you can see, the labeling file has the same schema as the input data, plus two additional columns: labeling_set_id and label.
The entire training dataset is divided into labeling sets. Each labeling set displays a labeling_set_id value. This identification simplifies the labeling process, enabling you to focus on the match relationship of records within the same labeling set, rather than having to scan the entire file.
If you specify the same label value for two or more records within a labeling set, you teach FindMatches to consider these records a match. On the other hand, when two or more records have different labels within the same labeling set, FindMatches learns that these records aren’t considered a match. FindMatches evaluates record relationships only between records within the same labeling set, not across labeling sets.
Here’s an example. The above table includes two labeling sets, 0 and 1. The first two records of labeling set 0 (the ones with the title starting with “Visual COKO . . .”) display label 0, and the next three records (title “Aurora . . .”) display label 1. FindMatches learns that the “Visual COKO” records match each other and the three “Aurora” records match each other. FindMatches also learns that the two Visual COKO records do not match the three “Aurora” records. However, the transform learns nothing about these records relative to the records in labeling set 1. For instance, FindMatches doesn’t try to evaluate whether the Visual COKO records match the first three records of labeling set 1 (which have the title “Self-tuning Histograms . . .”). This restriction helps the labeler focus on labeling only one set at a time.
If a record doesn’t have any matches, it should have a unique label value within the labeling set.
If varying the size of your labeling sets is the best way to express your data, it’s fine to do so. However, bear in mind that each labeling set must consist of no fewer than two records, and should generally contain no more than about 30 records. The size of each labeling set should be around 10.
Finally, if you don’t have any labeled data when you start a matching project, you don’t have to create the labeled data file from scratch. In this case, use the Generate labeling file functionality on the Teach page, which uses internal heuristics to select records for labeling.
These heuristics generate labeling files designed to contain labeling sets including examples of matches, non-matches, and pairs of records on the border between matches and non-matches. Similarly, if you generate your labeling files, you should obtain the best results by including sets representing both matching and non-matching records. Try to include some examples of tough judgment calls, as well.
Plan to label a few hundred records to achieve modest match quality. Plan to label a few thousand records to achieve high match quality.
Upload your labels and review match quality
After you create the labeled dataset, teach FindMatches where to find it.
- In the AWS Glue console, select the transform that you created earlier.
- Choose Action, Teach transform.

- On the following page, select I have labels, choose Upload labeling file from S3, and then choose Next.

- On the next page, for S3 path where the label file is stored, select the label file path:s3://ml-transforms-public-datasets-us-east-1/dblp-scholar/labels/dblp_scholar_labels_350.csv If you’re using FindMatches in a Region other than us-east-1, replace us-east-1 in the file URL with your Region.
- For this example, because you use only one set of labels, select Overwrite my existing labels. If adding labels iteratively, select the other option instead.
 Choose Upload. With the labels uploaded, your transform is now ready to use. Though not strictly required, check the transform match quality by reviewing the metrics of matching and non-matching records.
- On the next page, to access the metrics, choose Estimate transform quality. The transform quality estimate learns using 70% of your labels. After it’s trained, the quality estimate tests how well the transform learned to identify matching records against the remaining 30%. Finally, the transform generates quality metrics by comparing the matches and non-matches predicted by the algorithm vs. your actual labels. This process may take several minutes.
Your result should look like those in the following screenshot. Consider these metrics approximate, as the test uses only a small subset of data for estimating quality. If you’re satisfied with the metrics, proceed with creating and running a record matching job. Or, to improve matching quality further, upload more labeled records.

Create and run a record-matching job
After you create a FindMatches transform and verify that it has learned to identify matching records in your data, you’re ready to identify matches in your complete dataset.
- In the AWS Glue console, in the left navigation pane, choose Jobs, Add job.

- Under Configure the job properties, give the job a name, and select an IAM role. The IAM role should have permissions to access the Amazon S3 locations where you store your records and label files. For more information, see Create an IAM Role for AWS Glue.

- Under Security configuration, script libraries and job parameters, for Worker type, select 2X for all FindMatches jobs.

- On the next page, select the table within which to find matching records.

- On the next page, select Find matching records as the transform type. To review records identified as duplicate, do not select Remove duplicate records. Choose Next.

- Next, select the transform that you created and choose Next.

- On the next page, select Create tables in your data target. For Data store, select Amazon S3. For Format, choose CSV. For Target path, choose a path for the job’s output. Choose Save job and edit script.
 The script is generated for your job, ready for use as-is. Alternatively, you can customize the script further to suit your specific ETL needs. You have now configured your job.
- Choose Run Job to start identifying matches in this dataset. For now, leave the job parameters with the default settings, and close this page after starting the job.

The job for this sample dataset takes about 10+ minutes to complete. If the execution is successful, FindMatches shows the run status as Succeeded.
FindMatches saves your output data as a multi-part .csv file in the target path that you specified during the job creation. To review the output, copy the output files locally and merge them into a single .csv file. You can use any available method to merge the files.
For example, in macOS and Linux environments, use the following commands:
Review the output
Open the output.csv file and sort it by the match_id column. As mentioned earlier, your output has the same structure and data as the input table, but with an additional match_id column. Records identified as matching have the same match_id value.
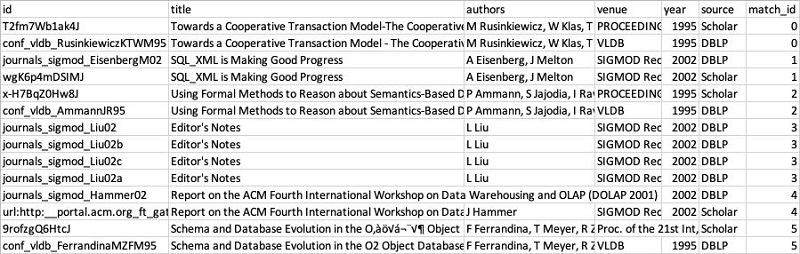
FindMatches should identify many matches in your records correctly. Upon closer examination, you may notice that some of the matches are not correct. The definition of a match depends on your specific use case. In the following table, the “Guest Editor’s Introduction” entries may not be considered as matching, as the authors and years are different.

Generally, your results should improve by labeling more data. In this example, you used only 352 labeled records. Out of that number, only 70% contributed to training the underlying ML model and 30% provided validation data for match quality metrics. Match quality should significantly improve as you increase the number of labeled records to the thousands.
Even as you label more data, fine-tune your sliders, and improve your match quality, you’re unlikely to ever reach 100% on both the Precision and Recall measures. Your output is always likely to have a certain percentage of false positive and false negative matches. A “false positive” is a pair of records that your transform labels as a match when they don’t match. A “false negative” is a real-world matching pair of records that your transform fails to label as a match. Consider this as you design the downstream workflows following the record-matching job.
Summary
In this post, you learned how to find matching records in two separate datasets using the Lake Formation FindMatches ML transform. You can find matches even when the records in the two datasets do not share a common identifier. You saw how this method helps you find matches between dataset rows, even when fields don’t match exactly or attributes are missing or corrupted.
Where to go from here? Start building with Lake Formation in the AWS console, try FindMatches on your data, and let AWS know how it’s going! Questions or feedback? Send an email to lakeformation-feedback@amazon.com.
About the Authors
 Sergei Dobroshinsky is a senior technical program manager in Amazon AI at Amazon Web Services.
 Tim Jones a software development manager in Amazon AI at Amazon Web Services.