AWS Database Blog
Implement Time to Live in Amazon Neptune, Part 1: Property Graph
Time to Live (TTL) is a mechanism that helps determine the longevity or lifespan of data, files, infrastructure, or even entire environments. When working with data, it could represent the amount of time a leaderboard expires in memory before being reloaded from storage, or how long a file must be kept for regulatory or compliance reasons before being deleted. TTL is usually implemented as either a counter or timestamp that is applied to the object or objects that need to be expired. As a timestamp, this is usually, but not always, a valued determined by the Unix epoch – the number of milliseconds that have elapsed since midnight on January 1st 1970.
In this post, we present how the TTL concept can be applied to data stored in your Amazon Neptune graph database. Neptune is a fully managed graph database service built for the cloud that makes it easier to build and run graph applications that work with highly connected datasets. We show you two separate options of how to create an efficient mechanism of implementing TTL in your Neptune graph database using an automated, event-driven architecture. Both options use AWS Lambda, a serverless compute service used to run code, and Amazon DynamoDB, a fast, flexible, NoSQL database service for single-digit millisecond performance at any scale.
This is part 1 of a series of posts dedicated to implementing Time to Live (TTL) in Amazon Neptune. Future posts cover more specific use-cases:
- Implement Time to Live for supernodes and properties for property graphs in Amazon Neptune
- Implement Time to Live for RDF graphs in Amazon Neptune
This post also assumes some working knowledge of the Gremlin and openCypher graph query languages. To learn more about these languages, refer to sample notebooks: Using Gremlin to Access the Graph and openCypher tutorials.
Design choices for TTL
In the first option, the client application is responsible for adding graph objects and TTL properties to both Neptune and DynamoDB. In the second option, the responsibility is moved away from the client application. We combine Neptune Streams, a change data log for your Neptune database, with Lambda to write details of graph objects with TTL properties to DynamoDB. For both options, graph objects are stored in DynamoDB where we use the native TTL feature of DynamoDB to automatically invoke a Lambda function when records expire.
The first approach we discuss to implement TTL in labeled property graphs within your Neptune cluster is to assign a property to each node and edge that represents the time by which the object should be removed. For example, by adding the property key-value pair TTL: 1673620444, you can periodically issue read queries to collect the IDs of the nodes and edges that need to be dropped. An example Gremlin query is as follows:
Then you issue a query to drop those nodes and edges, for example, in Gremlin:
Although this method works, it can introduce inefficiencies, such as:
- Dedicating compute resources to the drop queries – A query like
g.V().has('TTL', lte(1673620444))can result in buffer cache churn, which can affect the performance of other concurrent read queries. In addition, this type of query can result in the possibility of higher ConcurrentModificationExceptions due to the increased number of mutation queries. To avoid this, you need to dedicate a specific read replica to running the queries that find expired items. - Spending extra cycles on drop queries, to make sure items are expired within a certain time period past their defined TTL – Because the process of expiration follows a poll instead of push process, you need to manage the run of queries that find expired items on a schedule to make sure you find and clean up expired items within their allowed clean up window.
An alternative approach to implementing TTL in your Neptune database is to use additional services that natively provide similar functionality, for example DynamoDB, to automatically track changes to the database and manage the TTL process for you. Using DynamoDB, you can leverage its existing time to live feature to notify you when a record has expired, and then delete the object from your graph. Using these additional services to help manage the TTL process also expands TTL capabilities to expiring not only at the node or edge granularity, but expiring individual properties as well (which is not easily done using the manual method, because Neptune doesn’t support metaproperties, which are properties of properties).
Important: DynamoDB TTL is a background process, and it cannot guarantee when an item will be deleted. As stated in the documentation, DynamoDB TTL typically removes the corresponding items within a few days of expiration. This is due to variance in the size and activity level of a table.
Overview of solution
Here we will explore each option in more detail.
Option 1 – Synchronously update TTL in DynamoDB
In the first option, it is the responsibility of the client application to first write objects to the Neptune graph, and then write the resulting IDs of those objects, as well as its desired TTL value, to DynamoDB. We use a special tracking table in DynamoDB where TTL is enabled on the field containing the TTL expiration value. When DynamoDB expires items from our tracking table, we use DynamoDB Streams to detect the expiry and run a Lambda function that will remove the specified object from the Neptune database.
The following diagram illustrates the architecture.
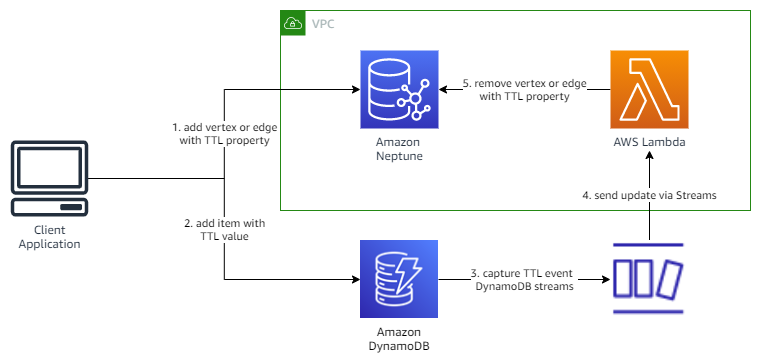
It’s recommended practice to build in back-off and retry mechanisms into the parts of your application that accesses data stores. For example, if the application fails to write to Neptune, you could use this approach to retry the request until it’s successful, and then continue writing the data to DynamoDB. If the write to DynamoDB failed, you can use the same approach to retry the request until its also successful.
Option 2 – Asynchronously update TTL in DynamoDB
In the second option, the client application is no longer responsible for writing data to our DynamoDB table. Instead, we enable Neptune Streams on the Neptune database cluster. Neptune Streams is a way of capturing up to the last 90 days of changes made to your graph data. For more information, refer to Using Neptune Streams.
In this architecture (see the following diagram), we deploy a Lambda function that polls Neptune Streams for inserts or updates of objects containing a TTL property. When it finds this, the function adds the item to the DynamoDB table.
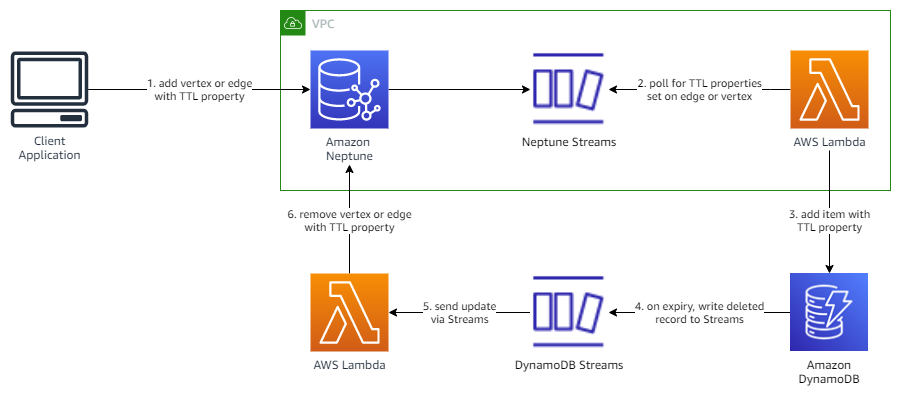
For this post, we recommend the second option, as this provides a more scalable, event-driven approach to implementing TTL, and will potentially reduce the amount of development needed for the client application.
We implement the solution through the following steps:
- Create a DynamoDB table with four attributes: one for the graph object ID, one for the object type, one containing the source of the record (for example,
neptune-streams), and another with the TTL value (number types only). - Enable DynamoDB Streams on the DynamoDB table.
- Create two Lambda functions: one to poll the Neptune stream for TTL objects and write them to DynamoDB, and the other to be invoked from DynamoDB Streams when a delete event is captured from the DynamoDB Streams as a result of DynamoDB TTL.
- Create a Neptune database cluster with Neptune Streams enabled.
- Create an Amazon SageMaker notebook connected to the Neptune database to write test queries.
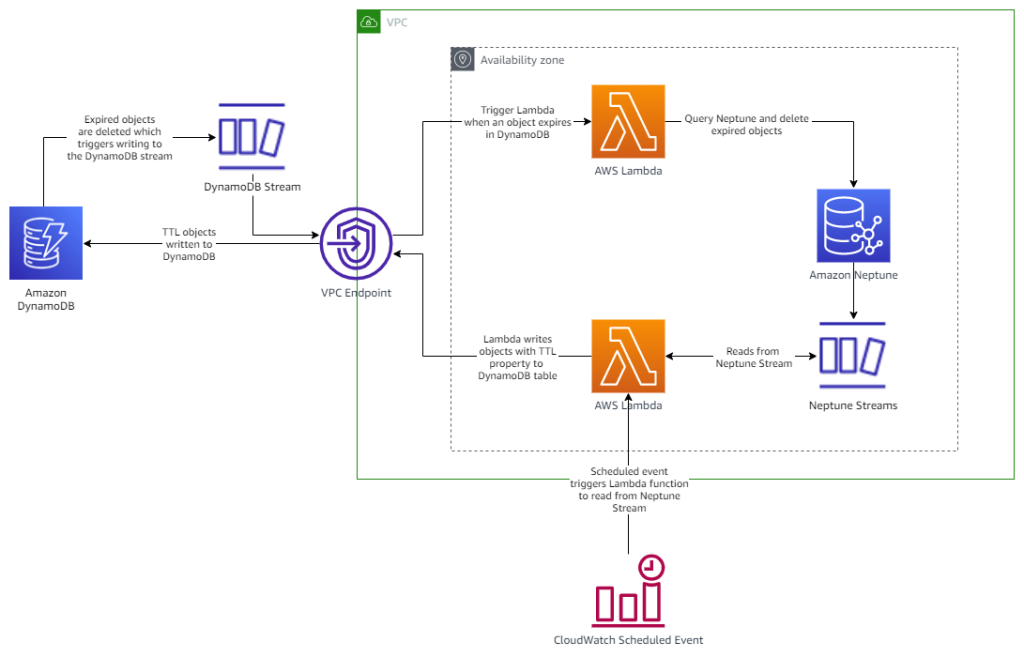
The easiest way to follow along with this post is to use the provided AWS CloudFormation template. This template creates the necessary Neptune cluster, Lambda functions, VPC endpoint for DynamoDB, DynamoDB table, and AWS Identity and Access Management (IAM) roles and policies that form the foundation of the solution. In addition, it creates a Neptune notebook to test the process, along with the architecture required to support the Neptune Streams polling mechanism (as described in Capture graph changes using Neptune Streams).
The following diagram illustrates the architecture of the stack.
Prerequisites
For this walkthrough, you should have the following prerequisites:
- An AWS account with permissions to create resources in Neptune, DynamoDB, and related services.
Optionally, a Neptune database cluster. - The accompanying CloudFormation template can provision this for you if required.
Deploy to a new Neptune cluster
We provide a CloudFormation template stack you can launch to create your resources. To deploy the CloudFormation template, complete the following steps:
- Download the CloudFormation template from GitHub.
- From the CloudFormation console, select Create stack then With new resources (standard).
- Under Specify template, upload the
neptune-ttl-main.yamlfile from the GitHub repository.

- Specify values for Stack name and ApplicationID, which will identify the resources launched. If desired, update the value for NeptuneTTLPropertyName if you wish to customize the name of the property used to represent the TTL value.

- Choose Next.
- Continue through the remaining sections.
- Read and select the check boxes in the Capabilities section.
- Choose Create stack.
The stack takes approximately 30 minutes to complete. Make sure the stack displays Create Complete before moving on to the next steps.
Deploy to an existing TTL-enabled environment or pre-existing Neptune cluster
TTL is a common requirement and as such, you may already have a graph model in place that stores TTL values for nodes and edges, or perhaps you already have a Neptune cluster deployed. To use the solution outlined in this post, complete the following steps:
- Enable Neptune Streams on your existing database.Note that this will require you to reboot your cluster for the change to take effect.
- Deploy the CloudFormation template, inputting the parameters specified.
- NeptuneTTLPropertyName: The name of the property used to store the TTL value on the nodes and edges in your graph.
- VPC: The ID of the VPC of your Neptune cluster.
- SubnetIds: The IDs of the subnets that are part of the DB subnet group of your Neptune cluster.
- SecurityGroupIds: The IDs of the security groups that are part of your Neptune cluster.
- RouteTableIds: The comma-delimited list of route tables that are used by the subnets that were specified above.
- CreateDDBVPCEndpoint: If you already have a DynamoDB VPC Endpoint in the VPC of your Neptune cluster, set this to false. Otherwise, leave the default of true.
- CreateMonitoringEndPoint: If you already have a Monitoring VPC Endpoint in the VPC of your Neptune cluster, set this to false. Otherwise, leave the default of true.
Please also note that if you are enabling this solution on top of a pre-existing TTL-enabled environment, the solution will only auto-expire records that were present in the Neptune Streams at the time of the solution deployment. This solution cannot backfill TTL objects whose Streams records are not available.
Test creating graph objects with TTL properties
As part of the CloudFormation deployment, a Neptune notebook has been created, which provides an easy way to test your TTL deployment is working. Complete the following steps:
- On the Neptune console, choose Notebooks in the navigation pane.
- Select the notebook with the prefix
aws-neptune-ttl, and on the Actions menu, choose Open Jupyter option.

- In the Jupyter notebook window, choose the Neptune folder and select the
TTL_Notebook.ipynb. - Run the code in the notebook in consecutive order.
By default, it creates 300 nodes and a randomized number of edges, all of which contain the TTL property along with a numeric value. To check if the objects have been correctly written to Neptune, you can run the supplied Gremlin queries.
For vertices, use the following query:
For edges, use the following query:
To check if the objects have been successfully written to the Neptune stream, run the %stream_viewer command supplied in the notebook.
Check TTL tracking in DynamoDB
After you confirm the objects have been successfully created in your graph database, we need to check that they’ve also been created in our DynamoDB table. Complete the following steps:
- On the DynamoDB console, choose Tables in the navigation pane. Choose the table with the prefix
NeptuneObject2TTL, then choose Explore table items. You’re redirected to a new page that displays a list of the first 50 items stored in the table.

- Choose View table details to navigate back to the table information page. From here, we’re going to check the stream and TTL settings for our table.
- On the Exports and streams tab, scroll down to the DynamoDB stream details section. Here we can enable or disable streams for out table, check the types of values that are being written to our stream, and also review the Lambda function that is triggered when any changes occur.

- Now we need to check the TTL settings for the table. On the Additional settings tab, scroll down to the Time to Live (TTL) section.
Here we can check whether TTL is enabled on our table, which record attribute DynamoDB is monitoring, and how many items have expired in the last 24 hours.

Check expired objects removed from Neptune
By now, some or all the objects created using the Neptune notebook will have expired, and have been automatically deleted from both the Neptune and DynamoDB databases. There are several different ways to confirm this has happened:
- Check the Amazon CloudWatch logs of the Lambda function that monitors the DynamoDB stream. See how it is triggered upon expiry, and then removes the corresponding objects from the Neptune database.
- Choose View graph in the Time to Live (TTL) section on our DynamoDB table.
This page displays the number of objects that have been deleted and when. - Run the following Gremlin queries in a Neptune notebook. The number of results you receive will depend on how long it’s been since creating the objects; however, by 20 minutes, all objects will have expired and be automatically deleted.
For vertices, use the following query:
For edges, use the following query:
TTL for graph object properties
The implementation of TTL outlined in this post only considers it being applied to graph objects, such as nodes and edges, and not properties. For example, what if you just wanted to expire a specific property rather than the entire object? How would you design your graph data model to store this extra data, while also being optimized for your use-cases? There are several options available; one example could be to create separate sub-graphs to store property TTL data away from the main graph. We discuss the design considerations and implementation for applying TTL to properties in our next post.
Alternative implementations
In this post, we’ve relied extensively on the native TTL features of DynamoDB to provide an automated mechanism for being notified about TTL events. Depending on the size of the graph, and number of expected TTL events occurring during a defined period, you could use alternative mechanisms. For example;
- Using a scheduled rule in Amazon EventBridge to trigger a Lambda function or AWS Batch task that queries Neptune for expired objects, and deletes them using a multi-threaded batch process.
- Using a scheduled EventBridge rule to poll the Neptune stream to identify expired objects and deletes them (note that this would only be applicable for TTL periods less than 90 days)
Cost considerations
The solution outlined in this blog includes additional services such as VPC endpoints, an AWS Step Functions state machine, Lambda functions, and DynamoDB. Using these services incurs additional cost beyond that of standard Neptune resource costs. For example, the cost of using DynamoDB and DynamoDB streams using on-demand capacity can be identified as follows:
- Each write less than 1KB to DynamoDB will cost 1 Write-Capacity Unit (WCU)
- Storage costs per GB/month
- Lambda invoked
GetRecordsAPI has a zero associated cost
The solution can be further fine-tuned to optimize for cost by leveraging Lambda event filtering on DynamoDB events to ensure only specific events trigger the Lambda function to delete graph objects. In addition, utilizing Lambda batching with DynamoDB can reduce Lambda invocation costs, and improve overall throughput by batching processing DynamoDB Stream events.
Clean up
When you’re done automatically stopping and starting your resources, you can visit the AWS CloudFormation console and delete the stack that you created. This removes all the resources that you created as part of this solution.
Conclusion
In this post, we demonstrated how to implement TTL in a Neptune database using native features of DynamoDB. To set the TTL value on an object (node or edge) in the Neptune database, the application inserts an item into a special tracking table in DynamoDB. The item specifies both the Neptune object and its desired TTL value. DynamoDB provides the ability to expire items from a table based on TTL. When it expires items from our tracking table, we use DynamoDB Streams to detect the expiry and in response remove the specified object from the Neptune database.
Feel free to ask questions in the comments.
About the Authors
 Melissa Kwok is a Neptune Specialist Solutions Architect at AWS, where she helps customers of all sizes and verticals build cloud solutions according to best practices. When she’s not at her desk you can find her in the kitchen experimenting with new recipes or reading a cookbook.
 Kevin Phillips is a Neptune Specialist Solutions Architect working in the UK at Amazon Web Services. He has 18 years of development and solutions architectural experience, which he uses to help support and guide customers.
 Mike Havey is a Solutions Architect for AWS with over 25 years of experience building enterprise applications. Mike is the author of two books and numerous articles. Checkout his Amazon author page.