AWS for Industries

Building Amazon Neptune based MedDRA terminology mapping for pharmacovigilance and adverse event reporting

September 8, 2021: Amazon Elasticsearch Service has been renamed to Amazon OpenSearch Service. See details.

Life Science companies are witnessing substantial growth in number of Adverse Events (AE) being reported for their products. This may be due to the increase in data volumes coming from journals, articles, social media, and non-standardized data sources. Evolving regulations and increasing pressure to improve quality and patient safety, while maintaining patient privacy rights, and providing efficient and cost effective operations are leading the organizations to rethink their strategy around legacy systems and manual processes.

Identifying and reporting adverse events (AE) during the clinical trials as well as post-approval is a critical part of ensuring long term product safety. Regulatory agencies require any serious adverse events be expeditiously reported when brought to the attention of the product manufacturers. Pharmacovigilance is the process of collecting, detecting, assessment, monitoring and prevention of adverse effects of pharmaceutical products.

In this blog post, we will demonstrate how customers can improve their pharmacovigilance processes by accelerating collection, transformation, and analysis and enrichment of data from sources such as call centers, as well as by identifying AEs, mapping them to appropriate ontologies such as MedDRA, and visualizing the results as a precursor to processing for submission to regulatory authorities.

Architecture Overview

Pharmaceutical call centers receive multiple calls from patients, and these calls need to be processed for any AE mentioned during the conversation. Typically it is a laborious process that requires trained personnel to review and interpret the call information. Moreover, regulatory agencies have mandated that serious AEs need to be reported within 15 days of receipt, regardless of the means by which the responsible person received the initial report. With the cost-pressures mounting, and increased scarcity of trained personnel, organizations are looking to artificial intelligence (AI) and machine learning (ML) based approaches to help process the calls, identify AE, and build reporting infrastructure for submission to regulatory authorities. In this blog we primarily use two AI services, Amazon Transcribe and Amazon Comprehend Medical, as well as a graph database, Amazon Neptune, for ontology mapping.

Amazon Transcribe makes it easy for developers to add speech-to-text capability to their applications. Audio data is virtual virtually impossible for computers to search and analyze. Therefore, recorded speech needs to be converted to text before it can be used in applications. Many of these providers use outdated technology that does not adapt well to different scenarios, like low-fidelity phone audio common in contact centers, which results in poor accuracy. Amazon Transcribe uses a deep learning process called automatic speech recognition (ASR) to convert speech to text quickly and accurately. Amazon Transcribe can be used to transcribe customer audio call recordings that come into the call center.

Amazon Comprehend Medical is a natural language processing service that makes it easy to use machine learning to extract relevant medical information from unstructured text. Using Amazon Comprehend Medical, you can quickly and accurately gather information, such as medical condition, medication, dosage, strength, and frequency from a variety of sources like doctors’ notes, clinical trial reports, and patient health records. Amazon Comprehend Medical can also link the detected information to medical ontologies such as ICD-10-CM or RxNorm so it can be used easily by downstream healthcare applications. We will show you how we use Comprehend medical to do contextual analysis of the transcribed call and then map to appropriate ontology such as MedDRA.

Amazon Neptune is a fast, reliable, fully managed graph database service that makes it easy to build and run applications that work with highly connected datasets. The core of Amazon Neptune is a purpose-built, high-performance graph database engine optimized for storing billions of relationships and querying the graph with milliseconds latency. Amazon Neptune supports popular graph models Property Graph and W3C’s RDF, and their respective query languages Apache TinkerPop Gremlin and SPARQL, allowing you to easily build queries that efficiently navigate highly connected datasets.
Loading Unified Medical Language System(UMLS) relationships from various ontologies onto a graph DB such as Neptune potentially opens up opportunities to perform graph compute algorithms and create knowledge graphs to answer interesting questions and relationships.

A typical architecture for the workflow described in this blog post for Adverse Event detection is as shown below:

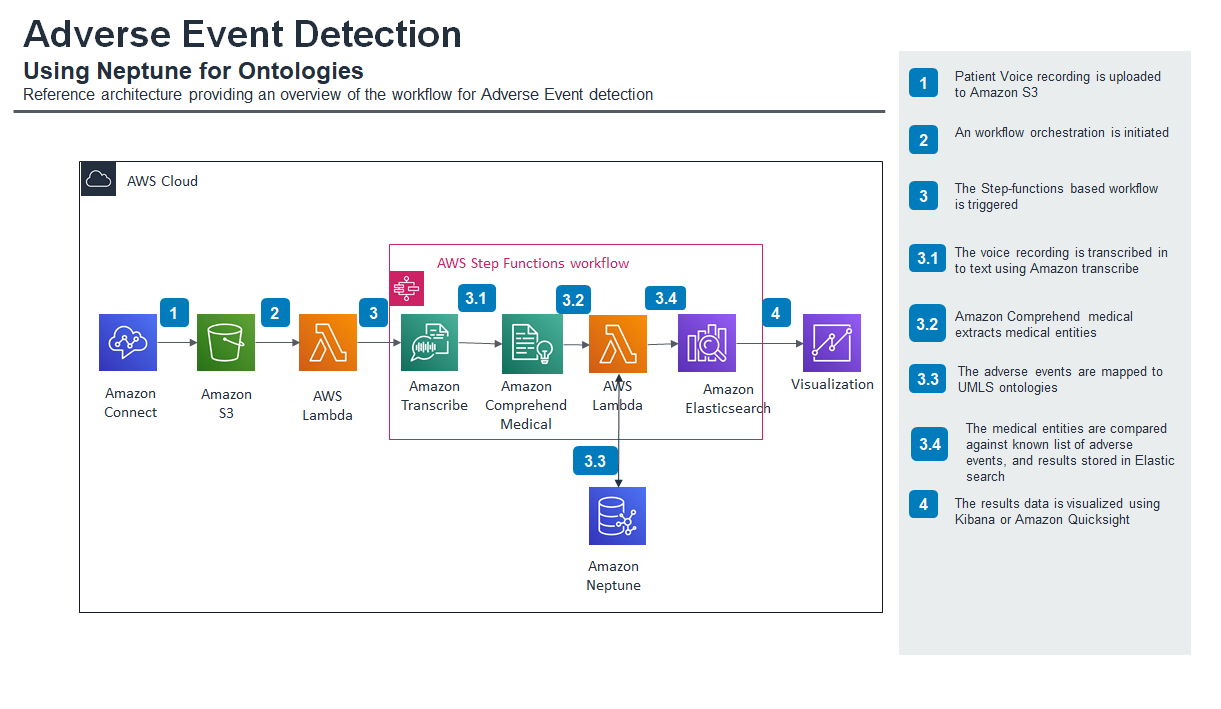
  1. A patient calls into the call center.
  2. The voice call is recorded and is stored for downstream processing in Amazon S3.
  3. The media gets transcribed into text using Amazon Transcribe Medical.
  4. The transcribed text gets further processed to extract relevant medical information using Amazon Comprehend Medical.
  5. The medical information is processed to identify potential AEs.
  6. The AEs and other medical information get mapped to an appropriate terminology such as MedDRA using a graph database such as Amazon Neptune
  7. A graphical representation is provided to the end user for building final artifacts as needed using Amazon OpenSearch Service (successor to Amazon Elasticsearch Service) and Kibana.

Walk through

Prerequisites:

Before we walk through the architecture, following are the prerequisite for implementing this in you your AWS account. We assume that the reader is familiar with Amazon S3, AWS Lambda, AWS Step functions, Amazon Neptune, Amazon OpenSearch Service, and Kibana. For implementing the solution, you’ll need:

  1. Create a Neptune Db cluster using AWS Cloudformation or manually.
  2. Population of UMLS to Neptune https://docs.aws.amazon.com/neptune/latest/userguide/get-started-create-cluster.html . For further details, refer to step 3.3
  3. OpenSearch Service domain and Kibana setup.
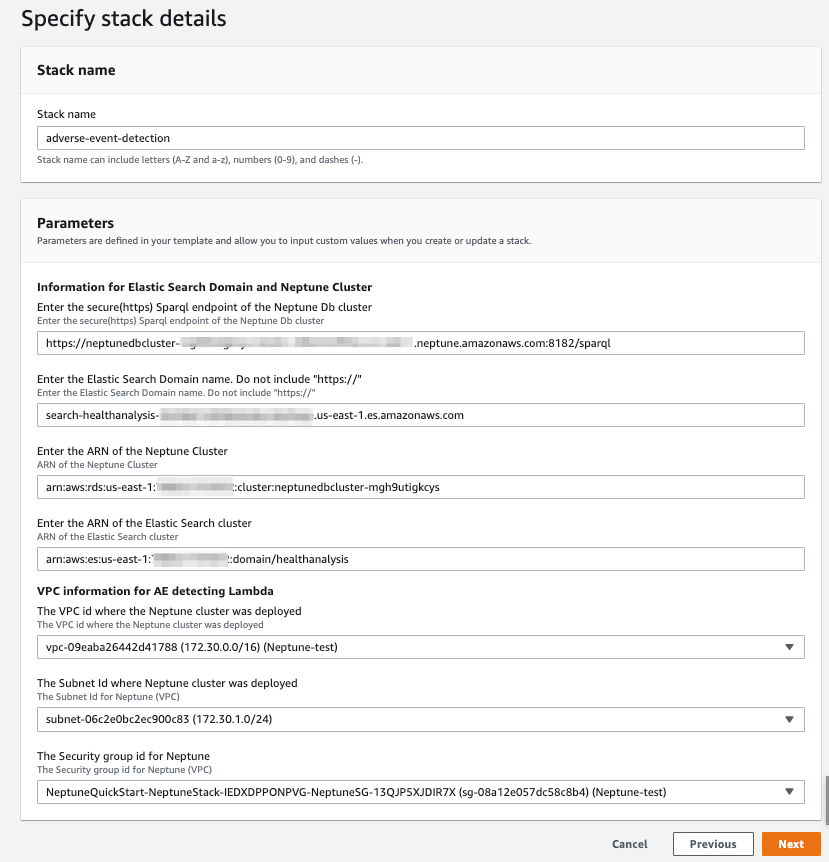
  4. Launch the AWS CloudFormation template by choosing the following, it creates the resources in the following steps (Stack is created in us-east-1 Region):

Step 1: Call recordings stored in S3

In this step, patient call recordings are stored in an S3 Bucket. The source for these call recording may be any call center application but for the purpose of this blog post we are going to use Amazon’s virtual contact center- Amazon Connect. For details on how to set Amazon Connect, please refer to this link. The S3 bucket to store the call recordings is created as part of the stack above in prerequisite #4.

Step 2: Event trigger for S3 object load

In this step, a call recording placed in S3 triggers a put_object event and a Lambda Step function is executed to kick off the workflow. This workflow processes the call recording data in sequential manner. For details on S3 event notification refer to this link.

Sample Lambda function code for S3 put object is shown below. Configuration values are Memory : 128 Mb, timeout : 3 min with environment variable value set to STEP_FUNCTIONS_ARN : Name of the step function to execute

'use strict';

const aws = require('aws-sdk');

var stepfunctions = new aws.StepFunctions();
const s3 = new aws.S3();

exports.handler = (event, context, callback) => {
   
    const bucket = event.Records[0].s3.bucket.name;
    const key = decodeURIComponent(event.Records[0].s3.object.key.replace(/\+/g, ' '));
    const params = {Bucket: bucket,Key: key};

    s3.getObject(params, (err, data) => {
        if (err) {
            console.log(err);
            const message = `Error getting object ${key} from bucket ${bucket}. Make sure they exist and your bucket is in the same region as this function.`;
            console.log(message);
            callback(message);
        } else {
            var job_name = key.replace("/", "-");
            var stepparams = {
              "stateMachineArn": process.env.STEP_FUNCTIONS_ARN,
               "input": "{\"s3URL\": \"https://s3.amazonaws.com/" + bucket + "/" + key + "\",\"JOB_NAME\": \""+ job_name + "\"}"
            };
            stepfunctions.startExecution(stepparams, function(err, data) {
              if (err) console.log(err, err.stack); // an error occurred
              else     console.log(data);           // successful response
            });
            callback(null, data.ContentType);
        }
    });
};

Step 3: Invoke Step Functions

In this step we will leverage AWS Step functions to orchestrate the Lambda functions created below and populate the data in Elastic search for visualization. The state machine for the step functions is as shown below:

The step function states above is kicked off when a call recording is uploaded to the s3 bucket. The call recording is sent to transcribe job which is polled until finished. The output of transcribe is sent to Comprehend Medical which is then sent to a function that detects and maps adverse events in Neptune. Finally, the output of Neptune is sent to a function that populates data in an Elastic search Database.

Below is the Amazon state language definition for the Step Function:

{
  "Comment": "A state machine that submits a Job to AWS Batch and monitors the Job until it completes.",
  "StartAt": "Transcribe Audio Job",
  "States": {
    "Transcribe Audio Job": {
      "Type": "Task",
      "Resource": "${funcCreateTranscribeJob}",
      "ResultPath": "$",
      "Next": "Wait X Seconds",
      "Retry": [
        {
          "ErrorEquals": [
            "States.ALL"
          ],
          "IntervalSeconds": 1,
          "MaxAttempts": 3,
          "BackoffRate": 2
        }
      ]
    },
    "Wait X Seconds": {
      "Type": "Wait",
      "SecondsPath": "$.wait_time",
      "Next": "Get Job Status"
    },
    "Get Job Status": {
      "Type": "Task",
      "Resource": "${funcGetTranscribeJobStatus}",
      "Next": "Job Complete?",
      "InputPath": "$",
      "ResultPath": "$",
      "Retry": [
        {
          "ErrorEquals": [
            "States.ALL"
          ],
          "IntervalSeconds": 1,
          "MaxAttempts": 3,
          "BackoffRate": 2
        }
      ]
    },
    "Job Complete?": {
      "Type": "Choice",
      "Choices": [
        {
          "Variable": "$.STATUS",
          "StringEquals": "IN_PROGRESS",
          "Next": "Wait X Seconds"
        },
        {
          "Variable": "$.STATUS",
          "StringEquals": "COMPLETED",
          "Next": "Get Final Job Status"
        },
        {
          "Variable": "$.STATUS",
          "StringEquals": "FAILED",
          "Next": "Job Failed"
        }
      ],
      "Default": "Wait X Seconds"
    },
    "Job Failed": {
      "Type": "Fail",
      "Cause": "AWS Batch Job Failed",
      "Error": "DescribeJob returned FAILED"
    },
    "Get Final Job Status": {
      "Type": "Task",
      "Resource": "${funcGetTranscribeJobDetails}",
      "InputPath": "$",
      "Next": "Medical Comprehend",
      "Retry": [
        {
          "ErrorEquals": [
            "States.ALL"
          ],
          "IntervalSeconds": 1,
          "MaxAttempts": 3,
          "BackoffRate": 2
        }
      ]
    },
    "Medical Comprehend" :{
      "Type": "Task",
        "Resource": "${funcMedicalComprehend}",
      "InputPath": "$",
       "Next": "Detect AE",
      "Retry": [
        {
          "ErrorEquals": [
            "States.ALL"
          ],
          "IntervalSeconds": 1,
          "MaxAttempts": 3,
          "BackoffRate": 2
        }
      ]
    },
    "Detect AE" :
    {
      "Type": "Task",
      "Resource": "${neptuneDataRetrieveAE}",
      "InputPath": "$",
       "Next": "Search Document in ES",
      "Retry": [
        {
          "ErrorEquals": [
            "States.ALL"
          ],
          "IntervalSeconds": 1,
          "MaxAttempts": 3,
          "BackoffRate": 2
        }
      ]

    },
    "Search Document in ES" : {
      "Type": "Task",
      "Resource": "${funcSearchDocumentInES}",
      "InputPath": "$",
       "Next": "Post data to Elastic Search",
      "Retry": [
        {
          "ErrorEquals": [
            "States.ALL"
          ],
          "IntervalSeconds": 1,
          "MaxAttempts": 3,
          "BackoffRate": 2
        }
      ]
    },
    "Post data to Elastic Search": {
      "Type": "Task",
      "Resource": "${funcPostDataES}",
      "InputPath": "$",
      "End": true,
      "Retry": [
        {
          "ErrorEquals": [
            "States.ALL"
          ],
          "IntervalSeconds": 1,
          "MaxAttempts": 3,
          "BackoffRate": 2
        }
      ]
    }
  }
}

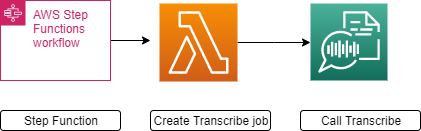
Step 3.1: Create Transcribe Job using a Lambda function

In this step, call recording is converted from Audio to text using Amazon Transcribe. The output of Amazon Transcribe process is stored in an s3 bucket. We understand that these audio recordings might contain some personal information. For data protection in Amazon Transcribe, refer to this link.

Sample Lambda function code for this step is as shown below.
Configuration values are Memory : 128 mb , timeout : 3 min with environment variable value set to
OUTPUT_BUCKET_NAME : Name of the bucket where transcribe output is store


var AWS = require('aws-sdk');

var transcribeservice = new AWS.TranscribeService();
exports.handler = (event, context, callback) => {

    console.log("start of transcribe job");

    var origJobName = event.JOB_NAME;
   
    var finalJobName = "";
    var indexOfFileName = origJobName.lastIndexOf('/');
    console.log(origJobName);
    if (indexOfFileName != -1) {
        indexOfFileName = parseInt(indexOfFileName) + 1;
        origJobName = origJobName.substring(indexOfFileName);
        finalJobName = origJobName.replace(":", "_");
        
    } else {
        finalJobName = origJobName;
    }

    // extract contact_id start
    var contactIdIndex = finalJobName.indexOf("_");
    var contactId = "";
    if (contactIdIndex != -1) {
        contactIdIndex = parseInt(contactIdIndex);
        contactId = finalJobName.substring(0, contactIdIndex);
    }

   
    var params = {
        LanguageCode: 'en-US',
        Media: {
            /* required */
            MediaFileUri: event.s3URL + ""
            
        },
        MediaFormat: 'wav',
        //TranscriptionJobName: finalJobName + Math.random(),
        TranscriptionJobName : finalJobName + Math.random(),
        OutputBucketName: process.env.OUTPUT_BUCKET_NAME,
        "Settings": {
            "ChannelIdentification": true,

        }

    };
    transcribeservice.startTranscriptionJob(params, function(err, data) {
        console.log(err);
        console.log(data)
        if (err) console.log(err, err.stack); // an error occurred
        else {
            console.log(data); // successful response
            event.wait_time = 60;
            event.JOB_NAME = data.TranscriptionJob.TranscriptionJobName;
            event.ContactId = contactId; 
            callback(null, event); 
        }
    });


};

After the transcribe job has started, the step function waits for the job to be completed before starting the next job. The GetJobStatus Lambda checks the transcribe job completion status. A sample code for this lambda function is provided below:

var AWS = require('aws-sdk');
var transcribeservice = new AWS.TranscribeService();

exports.handler = (event, context, callback) => {
    var params = {
      TranscriptionJobName: event.JOB_NAME /* required */
    };
    transcribeservice.getTranscriptionJob(params, function(err, data) {
      if (err) console.log(err, err.stack); // an error occurred
      else     console.log(data);           // successful response
      event.STATUS = data.TranscriptionJob.TranscriptionJobStatus;
      event.Transcript =data.TranscriptionJob.Transcript;
      callback(null,event);
    });
};

When the Transcribe job is complete, the transcribed document is stored in an S3 bucket, and the GetJobStatus state gets a “successful“ response.

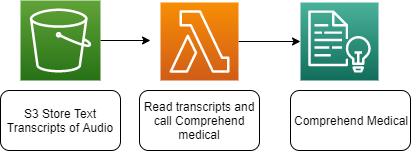
Step 3.2: Amazon Comprehend Medical to analyze transcription text

In this step, you’ll process the transcribed audio text from step 3.1 and perform contextual analysis. This step will execute Amazon Comprehend Medical to extract relevant medical information. Amazon Comprehend Medical service has an API to detect PHI in the text. The following sample code does not include detecting PHI and filtering out. Please refer to Detect PHI document to filter out PHI data from the analyzed text.

Sample Lambda function code for this step is as shown below. Configuration values are Memory : 128 Mb, timeout : 3 min with environment variable value set to TRANSCRIBE_OUTPUT_BUCKET: bucket where transcribe output is stored

var https = require('https');
let AWS = require('aws-sdk');
const s3 = new AWS.S3();
var comprehend = new AWS.ComprehendMedical();
exports.handler = function(event, context, callback) {

    
    var request_url = event.TranscriptFileUri;
    var signedUrl = "";
    
    // create signed url start 
     var credentials = new AWS.EnvironmentCredentials('AWS');
           
            const myBucket = process.env.TRANSCRIBE_OUTPUT_BUCKET
            
            
            var indexOfKeyMinusone = request_url.lastIndexOf('/');
            var myKey = "";
            var indexOfKey = "";
            
            if (indexOfKeyMinusone != -1) 
            {
                indexOfKey = parseInt(indexOfKeyMinusone) + 1;
                myKey = request_url.substring(indexOfKey);
            } 
            //
            
            console.log("key is " + myKey);
            const signedUrlExpireSeconds = 60 * 20160

            signedUrl = s3.getSignedUrl('getObject', {
            Bucket: myBucket,
             Key: myKey,
             Expires: signedUrlExpireSeconds
            })
    console.log(event);
    https.get(signedUrl, (res) => {
        var chunks = [];
        res.on("data", function(chunk) {
            chunks.push(chunk);
        });
        res.on("end", function() {
            var body = Buffer.concat(chunks);
            var results = JSON.parse(body);
            var transcript = results.results.transcripts[0].transcript;
            var params = {
                Text: transcript + ""
            };
            comprehend.detectPHI(params, function(err, data) {

                if (err) console.log(err, err.stack); // an error occurred
                else {
                    
                    var phiData = data;

                    comprehend.detectEntities(params, function(err, data) {
                     
                        if (err) console.log(err, err.stack); // an error occurred
                        else {

                            var medComprehendData = data;
                           
                            var finalData = {
                                "medComprehendOutput": medComprehendData,
                                "comprehendOutput": event.comprehendOutput,
                                "ContactId": event.ContactId,
                                "s3URL" : event.s3URL,
                                "transcriptLocation" : event.transcriptLocation
                               
                               
                            };

                            // successful response
                            callback(null, finalData);
              
                        } // successful response

                    });
                
                } // successful response
                
            });

        });

    }).on('error', (e) => {
        console.error(e);
    });

};

Step 3.3: Fetch ontology Data from Neptune for Adverse Event

In this step, you’ll search for the entities that come under MEDICAL CONDITION in Comprehend Medical output in Neptune Database and get the Ontology data associated with adverse events from MedDRA. You’ll need to load data from UMLS to Amazon Neptune database, the high level steps for which are as below:

      1. To install UMLS, you must first obtain a license from the National Library of Medicine. Download UMLS. Once downloaded, you can install UMLS by unzipping the file. It is best to use an EC2 instance with >50GB disk for this operation.
      2. Locate the scripts from installed UMLS to load the UMLS data to an RDBMS. Execute these script to populate data to the Database of your choice (details provided at https://www.nlm.nih.gov/research/umls/implementation_resources/scripts/index.html).
      3. Next step is to convert the RDBMS dataset to Resource Description Framework (RDF). Download umls2rdf project
      4. Execute umls2rdf.py by adding database connection information. This will create RDF files in Turtle format (“.ttl” extension).
      5. Create an S3 bucket. Copy TTL files to an S3 bucket.
      6. Load TTL files from S3 bucket to Neptune.

Sample Lambda function code for this step is as shown below. Configuration values are Memory : 128 Mb , timeout : 3 min with environment variable key value pair set to NEPTUNE_URL: url for Neptune instance created above.

import json
import xml
import requests
from SPARQLWrapper import SPARQLWrapper
from SPARQLWrapper import JSON, SELECT
import datetime
import os


def lambda_handler(event, context):
    aeEntities = event['medComprehendOutput']['Entities']
    aeFromOntology = []
    nonPhiList = []
    aeReviewRequired = False
    
    for entity in aeEntities:    
        cnt = 0
        if  entity['Category'] == "MEDICAL_CONDITION" and entity['Score'] > .50:
            sparql = SPARQLWrapper(os.environ['NEPTUNE_URL'])
            aeQuery = "SELECT ?s ?p ?o WHERE { ?s ?p \"" + entity["Text"].capitalize()  + "\"@en}"
            sparql.setQuery(aeQuery)
            
             # Convert results to JSON format
            sparql.setReturnFormat(JSON)
            results = sparql.query().convert()
            for result in results["results"]["bindings"]:
             print(result["s"]["value"])
             print("second query start")
             queryForDetails = "SELECT ?p ?o WHERE { <" + result["s"]["value"] +  "> ?p ?o }"
             print(queryForDetails)
             sparql.setQuery(queryForDetails)
             sparql.setReturnFormat(JSON)
             results = sparql.query().convert()
             print("second query end")
            
            aeTempRecord = {'aeEntityName' : entity['Text'], "aeEntityDetails" : results}
            aeFromOntology.insert(cnt,aeTempRecord)
            aeReviewRequired = True
            nonPhiList.insert(cnt,entity)
            cnt += 1

    event["aeOntologyData"] = aeFromOntology
    event["aeReviewRequired"] = aeReviewRequired
    event["medComprehendOutput"]["Entities"] = nonPhiList;
    
    #add datetimestamp

    datetime_object = datetime.datetime.now()
    #format = '%b %d %Y %I:%M%p' # The format 
    timestampStr = datetime_object.strftime("%Y-%m-%dT%H:%M:%S.%f")
    event["lastModifiedRecTimestamp"] = timestampStr
  
    return (event)

Step 3.4.1: Call to Elastic Search to Search data

The following lambda function will search the document with contactId of the call recording and if the document is present it will pass it to the next Lambda function.

Sample Lambda function code for this step is as shown below with configuration values Memory : 128 Mb , timeout : 3 min and environment variable key value pair set to ES_DOMAIN: Url for Elastic search Domain

  const https = require('https');
const AWS = require('aws-sdk');
const s3 = new AWS.S3();
exports.handler = function(event, context, callback) {
  var domain = process.env.ES_DOMAIN;
  var endpoint = new AWS.Endpoint(domain);
  var request = new AWS.HttpRequest(endpoint, "us-east-1");
  
  var document = event;
 
  var data = JSON.stringify(document);
  request.method = 'GET';
  request.path += 'callanalysis/_search/' + "?q=ContactId:" + document.ContactId;
  request.headers['host'] = domain;
  request.headers['Content-Type'] = 'application/json';
  

  var credentials = new AWS.EnvironmentCredentials('AWS');
  
  var signer = new AWS.Signers.V4(request, 'es');
  signer.addAuthorization(credentials, new Date());

  var client = new AWS.HttpClient();
  client.handleRequest(request, null, function(response) {
    console.log(response.statusCode + ' ' + response.statusMessage);
    var responseBody = '';
    response.on('data', function (chunk) {
      responseBody += chunk;
    });
    response.on('end', function (chunk) {
      console.log('Response body: ' + responseBody);
     
       var responseBodyObj = JSON.parse(responseBody);
       var searchHit = "";
       var finalDocument = document;
       
      if (responseBodyObj.hits && responseBodyObj.hits.hits[0])
      {
       searchHit = responseBodyObj.hits.hits[0]._source;
       finalDocument = Object.assign(searchHit,document);
       
      }
      
      callback(null,finalDocument);
    });
  }, function(error) {
    console.log('Error: ' + error);
    callback(error,null);
  });
  
}

Step 3.4.2: Call to Elastic Search to post data

The following lambda function will post the document with contactId of the call recording

Sample Lambda function code for this step is as shown below with configuration values Memory : 128 Mb , timeout : 3 min and environment variable key value pair set to ES_DOMAIN: Url for Elastic search Domain

The lambda Function below updates the data in Elastic search using contactId as the primary key.

const https = require('https');
const AWS = require('aws-sdk');


exports.handler = function(event, context, callback) {
  var domain = process.env.ES_DOMAIN
  var endpoint = new AWS.Endpoint(domain);
  var request = new AWS.HttpRequest(endpoint, "us-east-1");
  var document = event;
 
  var data = JSON.stringify(document);
  request.method = 'POST';
  request.path += 'callanalysis/_doc/' + document.ContactId;
  request.body = data;
  request.headers['host'] = domain;
  request.headers['Content-Type'] = 'application/json';
  // Content-Length is only needed for DELETE requests that include a request
  // body, but including it for all requests doesn't seem to hurt anything.
  request.headers['Content-Length'] = Buffer.byteLength(request.body);;

  var credentials = new AWS.EnvironmentCredentials('AWS');
  var signer = new AWS.Signers.V4(request, 'es');
  signer.addAuthorization(credentials, new Date());

  var client = new AWS.HttpClient();
  client.handleRequest(request, null, function(response) {
    console.log(response.statusCode + ' ' + response.statusMessage);
    var responseBody = '';
    response.on('data', function (chunk) {
      responseBody += chunk;
    });
    response.on('end', function (chunk) {
      console.log('Response body: ' + responseBody);
      callback(null,"success");
    });
  }, function(error) {
    console.log('Error: ' + error);
    callback(error,null);
  });
  
}

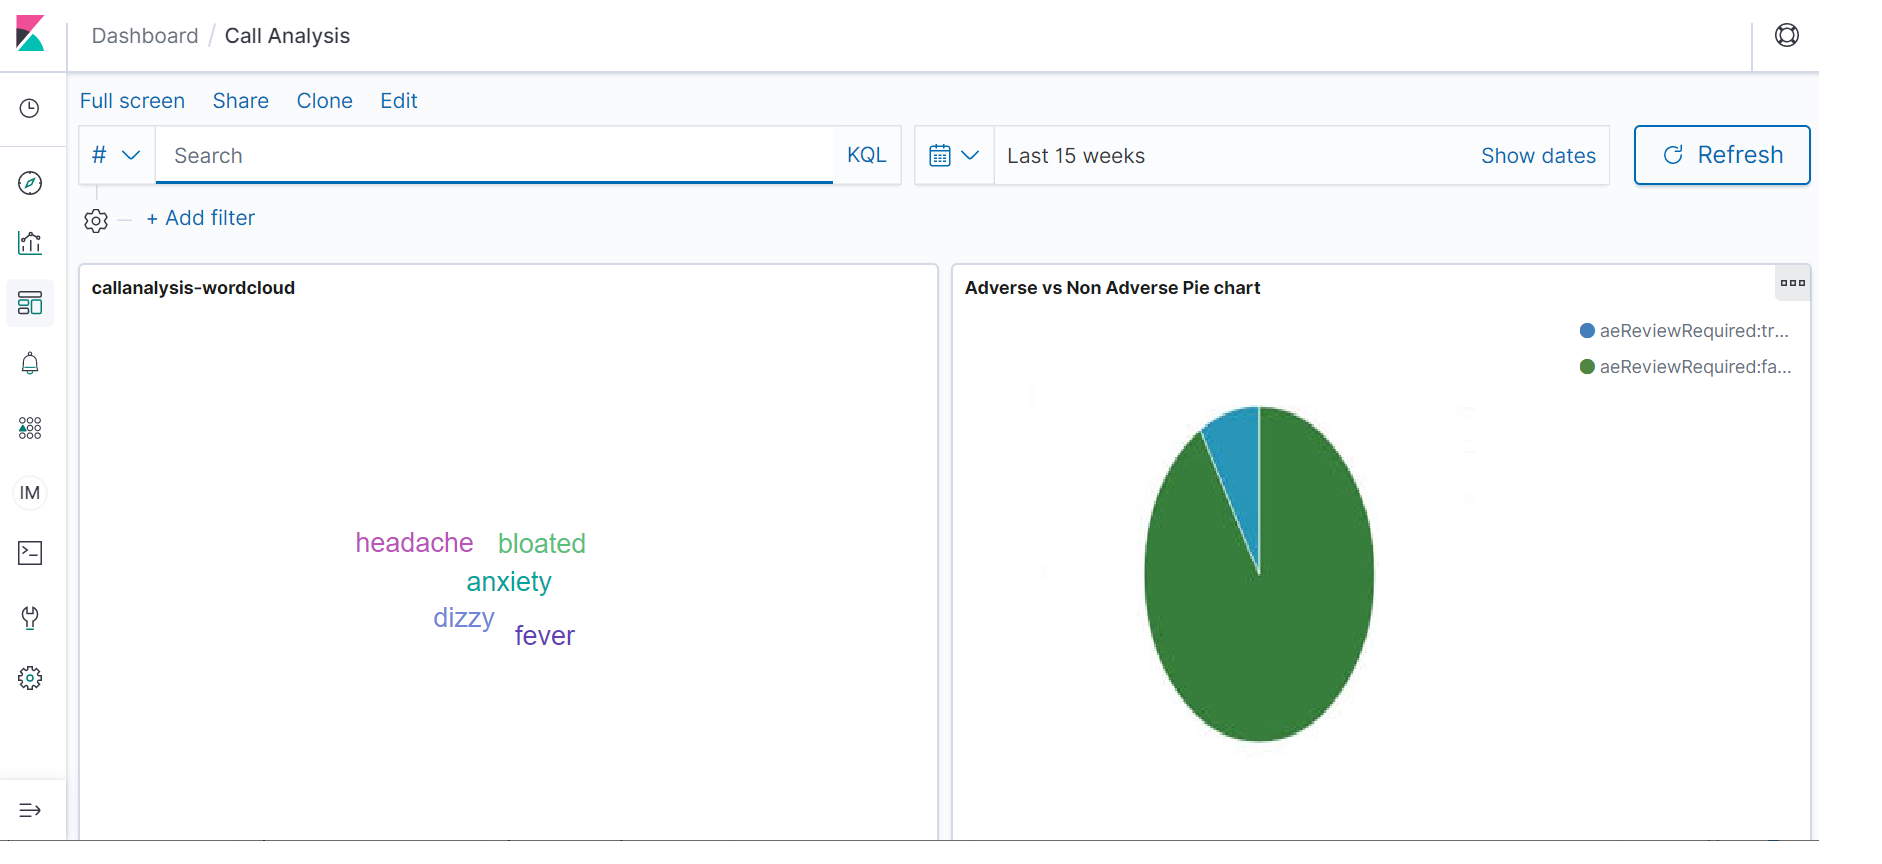
Step 4: Visualize Data in Kibana Dashboard

In this step you will visualize the data posted in Elastic Search cluster on Kibana Dahsboard.

    • We have a word cloud that displays Medical entities such as diagnosis and medical conditions.
    • The pie chart represents the count of adverse events Vs non adverse events calls.
    • The tabular chart shows detailed data in JSON format with all the fields listed

Security Considerations

At AWS, security is job zero. We follow a shared security responsibility model. AWS provides secure infrastructure and services, while you, the customer, are responsible for secure operating systems, platforms, and data. If you are planning to process healthcare sensitive information such as Patient Health Information (PHI), the white paper provides a guidance on protecting PHI, how to use AWS to encrypt data in transit and at-rest and how AWS features can be used to run workloads containing PHI.

Summary

In conclusion, in this blog post we showed you how to reduce the cycle times of AE detection by enabling faster case intakes and processing through automation. Integrating MedDRA ontology using Amazon Neptune improves the consistency of AE reporting and minimizes the time and effort by reducing the manual steps. By using Amazon Transcribe, Amazon Comprehend Medical we demonstrated how you could increase the accuracy of AE detection and produced a scalable solution to handle future case volume growth with diverse types of incoming data formats effectively.

Interested in implementing an adverse event detection workflow? Contact your account manager or contact us here to get started.

Further Readings

Vaijayanti Joshi

Vaijayanti Joshi

Vaijayanti Joshi is a Boston-based Solutions Architect for AWS. She is passionate about technology and enjoys helping customers find innovative solutions to complex business challenges. Her core areas of focus are , Machine Learning, and Analytics. When she’s not working with customers on their journey to the cloud, she enjoys biking, swimming, and exploring new places.

Deven Atnoor, Ph.D

Deven Atnoor, Ph.D

Deven Atnoor is an Industry Specialist in AWS’ Global Healthcare and Life-Sciences practice. Leveraging his domain knowledge, Deven is building digital transformation solutions for unlocking the power of data using AWS; enabling healthcare and life sciences customers to generate insights from their data assets to fuel innovation in order to deliver better outcomes for patients. Deven received a Ph.D. Chemical Engineering from the University of Cincinnati and a B.S. from the Indian Institute of Technology, Bombay, India.

Sudhanshu Malhotra

Sudhanshu Malhotra

Sudhanshu Malhotra is a solutions architect at AWS. Sudhanshu enjoys working with customers and helping them deliver complex solutions in AWS in the area of DevOps, infrastructure as code, and config management. In his spare time, Sudhanshu enjoys spending time with his family, hiking, and tinkering with cars.