AWS Partner Network (APN) Blog
Connect Microcontroller-Based Devices to the Cloud with Amazon FreeRTOS and Espressif ESP32
By Anton Shmagin, Partner Solutions Architect at AWS
 We are pleased to announce that Amazon FreeRTOS code for ESP32 is available on the Amazon FreeRTOS GitHub repository.
Espressif Systems is a multinational, fabless semiconductor company established in 2008, with headquarters in Shanghai and offices in Greater China, India, and Europe. For the last decade, they have been focused on producing connected microcontrollers and System-on-Modules (SoMs) for the emerging mobile and Internet of Things (IoT) markets.
Espressif has worked diligently to connect a number of their popular IoT SoMs to Amazon Web Services (AWS) IoT services. Here, we’ll discuss how to start running Amazon FreeRTOS on ESP32 in order to connect to AWS IoT Core.
In this post, I will guide you through the steps to:
- Set up the ESP-IDF development environment for Amazon FreeRTOS
- Establish a connection between the ESP32 Development Board and your computer
- Run Amazon FreeRTOS demo code on ESP32 Development Board publishing messages to AWS IoT Core
Prerequisites
- ESP32 Development Board
- MicroUSB to USB A cable
- AWS account (free tier is sufficient)
- AWS Command Line Interface (CLI)
- boto3 AWS Software Developer Kit (SDK) for Python
- Sufficient disk space (~500Mb) for Xtensa toolchain, and Amazon FreeRTOS source code
- We assume that Xtensa toolchain, ESP-IDF, and amazon-freertos code will be installed in esp directory in the user’s home: ~/esp. You will need to add ~/esp/xtensa-esp32-elf/bin to your $PATH
Hardware Setup
While there are a number of ESP32 Development Boards available on the market, in this post we’ll use the one developed by Espressif: ESP32-DevKitC V4
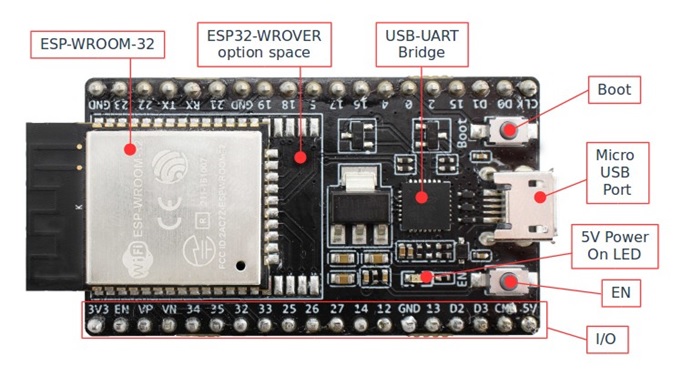
Please make sure that drivers for the board are installed. When installing the driver for Silicon Labs CP2104 on Mac OS High Sierra, you may need to restart installation after whitelisting the installation package in System Preferences > Security & Privacy.
On Windows the driver would enumerate the port as COMx:

On Mac OS it would be:
And on Linux:
Build Instructions for Amazon FreeRTOS with ESP32 Support
To get started, follow the ESP-IDF Getting Started Guide for your platform to set up the toolchain (Xtensa GCC compiler) for your OS. Please stop at the “Get ESP-IDF” section.
1. Clone amazon-freertos repository:
2. There is no need to set an explicit IDF_PATH; it will be picked up from amazon-freertos itself.
We recommend to unset if already set:
3. Set your serial port and baud rate:

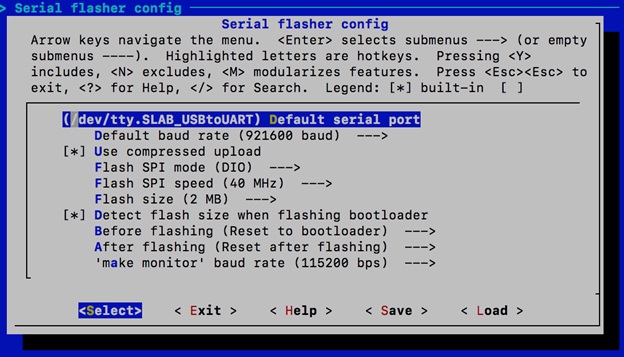
Please note that for ESP32-DevKitC, the serial port will be COMx on Windows, /dev/tty.SLAB_USBtoUART on Mac OS, and /dev/ttyUSB0 on Linux.
4. Set AWS credentials and WiFi configuration.
Navigate to ~esp/amazon-freertos/demos/common/tools/aws_config_quick_start/ directory and edit configure.json file.
As an example, it can be like the one below, where afrtest is the AWS IoT Thing name, myAP is our wireless network SSID ESP32 development board will be connecting to, codehappy.2018 is the password for our wireless network, and eWiFiSecurityWPA2 is the security technology we use with our access point.
Other possible values for security technology are: (eWiFiSecurityOpen, eWiFiSecurityWEP, eWiFiSecurityWPA). Please avoid using anything except WPA2, as it is one of the easiest attack vectors on your wireless network.
5. Save the file.
6. Make sure the AWS CLI is installed on your system.
Check if the AWS CLI is operational by executing the following command:
Command should return output similar to:
For more information, see Installing the AWS Command Line Interface and also Configuring the AWS CLI.
When running on Windows using the mingw32 environment, install the AWS CLI using the following command: easy_install awscli
7. Install the boto3 Python module using the following command:
On Windows in the mingw32 environment: easy_install boto3
On MacOS or Linux: pip install boto3
8. Once you have boto3, navigate to the directory: ~/esp/amazon-freertos/demos/common/tools/aws_config_quick_start
Run the following command:
This script creates an IoT thing, certificate, and IoT policy. It will attach the IoT policy to the certificate and the certificate to the IoT thing. It will also populate the file aws_clientcredential.h with your AWS IoT endpoint, WiFi SSID, and credentials.
Finally, it will format your certificate and private key and write them to the header file: aws_clientcredential_keys.h
9. Build and upload demo project.
Go to the directory: amazon-freertos/demos/espressif/esp32_devkitc_esp_wrover_kit/make
This directory contains an Amazon FreeRTOS demo project:
This application is the default Amazon FreeRTOS MQTT echo application, so please subscribe to “freertos/demos/echo” in AWS IoT. Test the console and monitor messages from your device.
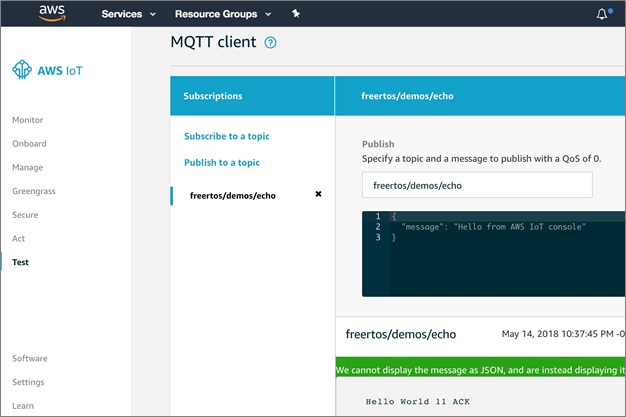
AWS IoT Console – Test Tab
Conclusion
In this post, we demonstrated how to configure and deploy a simple IoT application that publishes and receives messages to AWS IoT Core using the MQTT protocol.
You can explore other examples by editing the file: amazon-freertos/demos/common/demo_runner/aws_demo_runner.c
For a detailed overview of Amazon FreeRTOS on the ESP32 platform, please refer to the official documentation.
Keep on building!